Personalize this lesson
Adapt explanations and teaching visuals to your background and preferred voice.
Consider an eight-expert layer that routes each token to two feed-forward networks. That sounds like a smaller model until you try to load its weights. Why can the arithmetic be sparse while the memory footprint stays large?
In the Transformer lesson, one feed-forward network (FFN) transformed each token after attention mixed information across positions. Mixture of Experts (MoE) replaces that FFN with a pool of expert networks and a router that selects a few for each token. The expert choice can change at every layer and position; it isn't a once-per-request choice between a math model and a code model.
The tradeoff moves rather than disappears: weights still need a home, routed token states may cross GPUs, and skewed choices can overload one expert. For one token, the router chooses a few experts and blends their outputs. Skipped experts do no expert computation for that token, but their weights still have to be stored or fetched for other tokens.
From one FFN to many experts
In a standard Transformer layer, the FFN sublayer is one dense network. In an MoE layer, that FFN is replaced by parallel expert FFNs plus a router (also called a gating network) that picks which experts handle each token. Those winners are a top-k subset.[1]
In many MoE LLMs, experts replace only the FFN. The attention parameters are shared rather than duplicated inside every expert.[2][3] That doesn't require full dense attention: FFN routing and attention sparsity are separate choices. A common router is a linear projection: multiply the token's hidden state by a learned matrix to get scores. It chooses an FFN path, not which tokens attend to one another.
With scores 0.52, 0.17, 0.26, and 0.05 and top-2 routing, E1 and E3 run. E2 and E4 remain stored but contribute no expert computation for this token. Bar length below encodes the router probability.
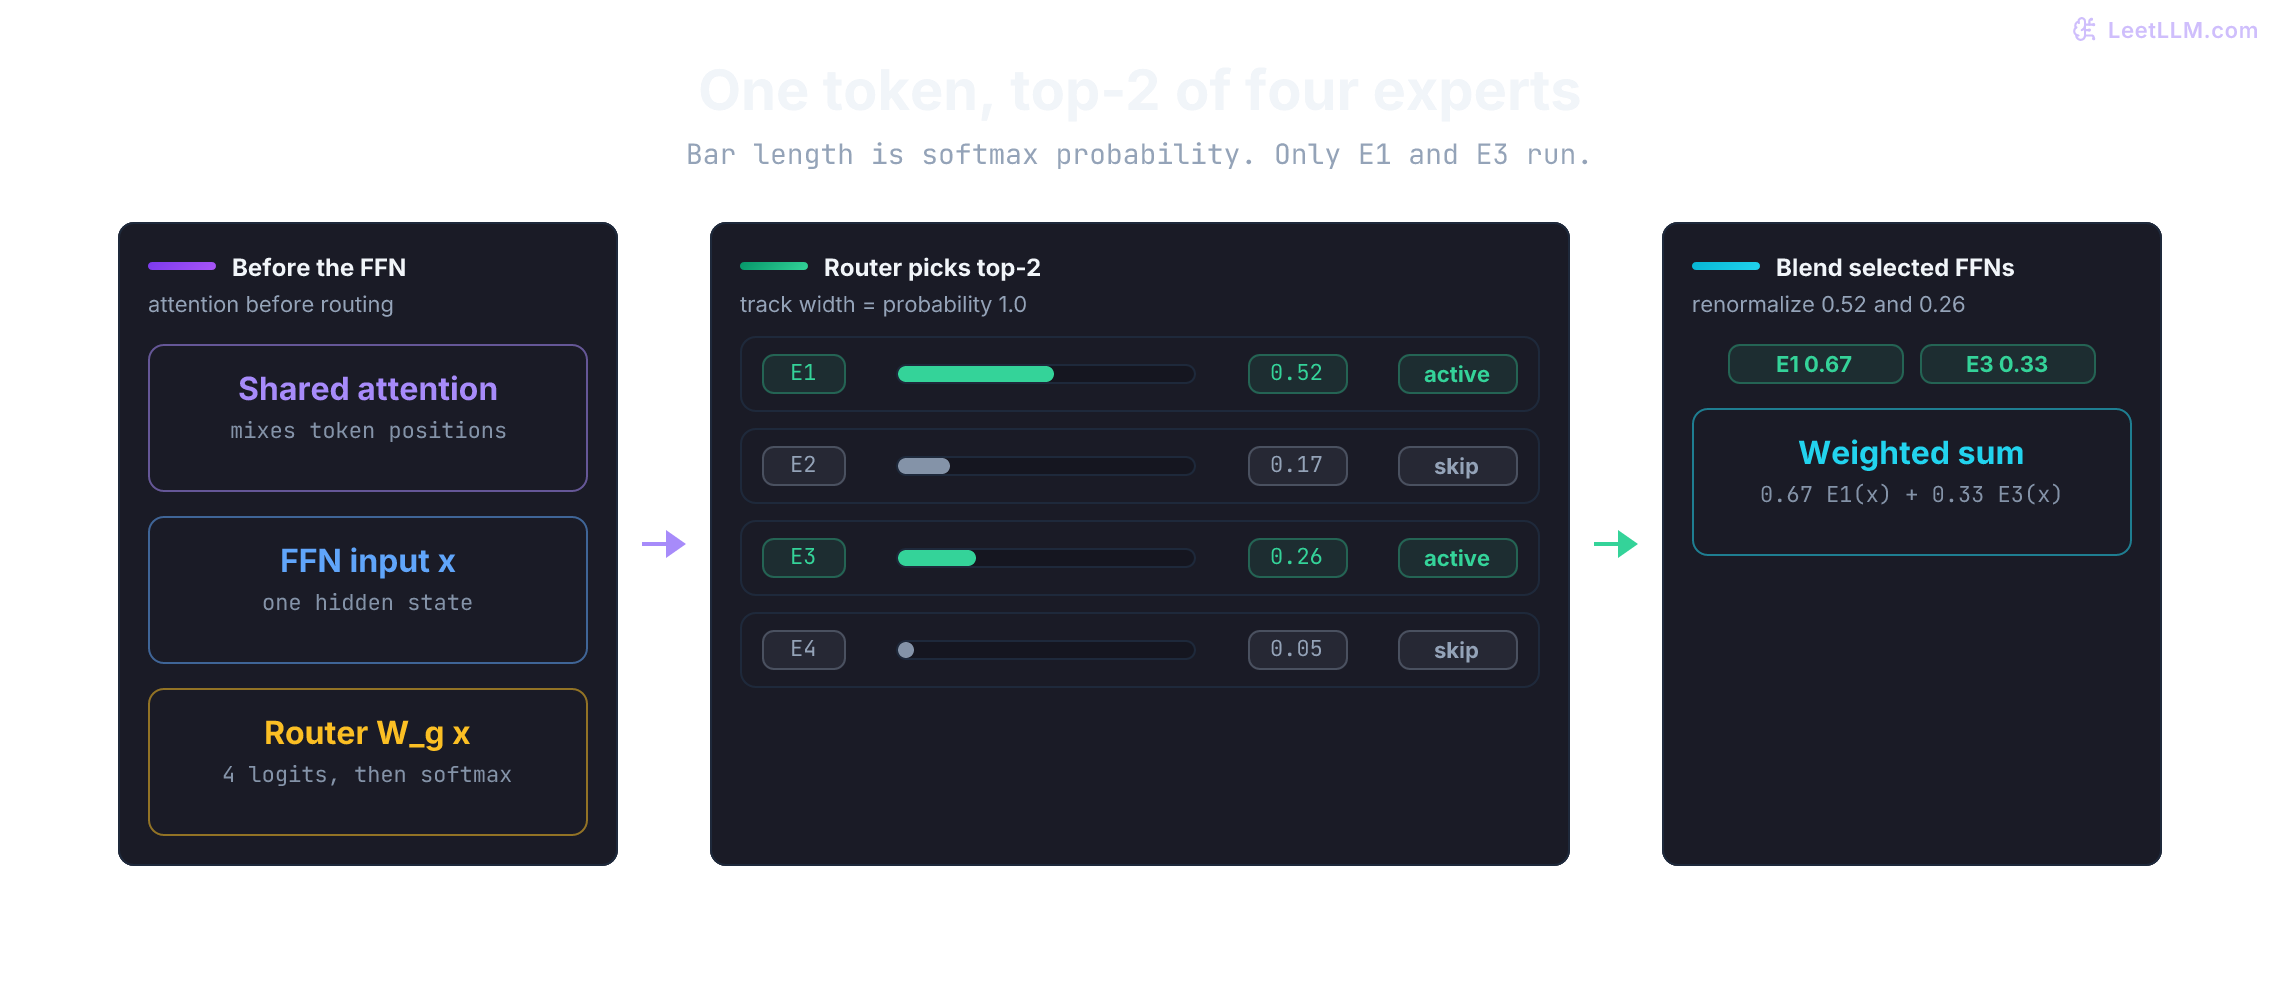
Which parts of a Transformer layer are usually replicated in modern MoE LLMs?
Answer
The FFN sublayer becomes a pool of expert FFNs. Attention, embeddings, normalization, and shared block logic remain outside that pool. Their parameters aren't duplicated once per expert.
A concrete routing walkthrough
For a Mixtral-style router, top- keeps two experts and rescales their probabilities to sum to one. Follow the same token through scoring, selection, and blending. Other routers use different weighting rules, so this convention belongs to the example rather than to every MoE.
Setup
- One token arrives with a hidden state of dimension 4.
- There are 4 experts, each a small FFN.
- The router uses top-.
Step 1: Router scores
The router multiplies the token by a learned weight matrix to get a raw score for each expert. Suppose the scores come out as:
| Expert | Raw score (logit) |
|---|---|
| 1 | -0.65 |
| 2 | -1.77 |
| 3 | -1.35 |
| 4 | -3.00 |
Step 2: Softmax probabilities
Apply softmax so the scores become probabilities that sum to 1. Approximate probabilities:
| Expert | Probability |
|---|---|
| 1 | 0.52 |
| 2 | 0.17 |
| 3 | 0.26 |
| 4 | 0.05 |
Step 3: Top-k selection
Pick the top 2 experts: Expert 1 (0.52) and Expert 3 (0.26).
Step 4: Renormalize
The selected weights are renormalized so they sum to 1 inside the chosen subset:
- Expert 1:
- Expert 3:
Step 5: Expert computation
Only Experts 1 and 3 run. Each processes the same input token through its own FFN weights.
- produces output vector
- produces output vector
Step 6: Weighted sum
The MoE sublayer blends the two expert outputs with the renormalized gate weights. The surrounding Transformer residual connection isn't included here:
Experts 2 and 4 never process this token, so they contribute no expert-FFN FLOPs for this decision. Their weights still need to be stored or fetched for other tokens that may select them.
The next snippet uses the exact logits, not the rounded table, and should recover the same selected pair and 0.67 / 0.33 split.
from math import exp

logits = [-0.65, -1.77, -1.35, -3.00]
unnormalized = [exp(score - max(logits)) for score in logits]
probabilities = [value / sum(unnormalized) for value in unnormalized]
selected = sorted(range(len(probabilities)), key=probabilities.__getitem__, reverse=True)[:2]
selected_total = sum(probabilities[index] for index in selected)
weights = [probabilities[index] / selected_total for index in selected]

print("selected experts:", [index + 1 for index in selected])
print("renormalized weights:", [round(weight, 2) for weight in weights])
print("selected weight sum:", round(sum(weights), 2))selected experts: [1, 3]
renormalized weights: [0.67, 0.33]
selected weight sum: 1.0What are the six steps for tracing one token through top-k MoE routing?
Answer
Compute router logits, apply softmax, select the top-k experts, renormalize the selected weights, run only the selected expert FFNs, then blend their outputs with the renormalized gate weights.
Write the selected-expert sum
The same walkthrough is one compact equation. For an input token :
For this Mixtral-style rule, the router computes a distribution over all experts, keeps the top- entries, and renormalizes them into . Equivalently, mask the unselected logits to negative infinity before softmax. Mixtral uses top-2 out of eight.[2] Each selected maps the same hidden state back to the same dimension, so their weighted outputs can be added.
Renormalization isn't mandatory across architectures. Switch Transformer uses top-1 and retains the selected expert's original softmax gate. If you renormalized a single surviving gate, it would always equal 1: away from selection boundaries, the task loss would lose that differentiable path into the router.[4] Shared experts, when present, add another always-on output path outside this routed sum.
Why does the Mixtral-style example renormalize selected weights, and why shouldn't you apply that rule blindly to top-1?
Answer
Renormalization makes this example's selected weights sum to 1. With top-1 it makes the sole weight constant, removing its task-loss gradient to the router. Switch instead preserves the original selected gate; routing weights are architecture-specific.
The weighted sum explains one token's result. The next question is resource accounting: what grows with the full expert pool, and what stays tied to ?
Why sparse activation can pay off
Two quantities now diverge. An MoE layer can keep per-token expert FLOPs tied mostly to while total weight residency follows all experts. Distributed serving adds token-dispatch traffic, so active parameters alone can't predict latency.
| Property | Dense baseline (~active compute) | MoE model (Mixtral-shaped) |
|---|---|---|
| Total parameters | ~13B illustrative dense peer | ~46.7B (8 experts) |
| Active parameters/token | ~13B | ~12.9B (top-2 of 8) |
| FFN arithmetic per token | All dense FFN weights | Selected expert FFNs plus router |
| Other work | Attention and shared layers | Attention, shared layers, grouping and dispatch |
| Quality at similar arithmetic | Must be evaluated | Extra capacity may help; not guaranteed |
Adding experts while keeping top- fixed grows the FFN parameter pool, but each token still runs only a small subset. Routing, batching, and communication still add overhead, so "same active parameters" isn't identical latency.
Expert computation per token is sparse. Weight storage follows the full pool; communication follows token routes and expert placement, not total parameter count alone. Training state must account for the parameter pool, with sharding and optimizer-specific storage. A token's task gradient reaches its selected expert paths; this doesn't mean every other weight stays unchanged after a batch update, momentum, or weight decay.
Only the FFN blocks are replicated across experts. Attention layers, embeddings, normalization layers, and the router stay shared. That's why Mixtral 8x7B is about 46.7B total parameters and about 12.9B active parameters per token, not the naive 56B and 14B you would get from multiplying everything by 8. The Mixtral paper rounds those counts to 47B and 13B.[2]
Active parameters mostly drive per-token expert FLOPs. Total parameters drive weight memory and checkpoint size. Network traffic depends on where selected experts live.
To separate the counts without reverse-engineering a checkpoint, use a hypothetical model with 3B shared parameters and eight 2B expert partitions. Each partition represents one expert position aggregated across the MoE layers. Assume top-2 at every such layer and two bytes per stored weight.
shared_parameters_b = 3.0
expert_parameters_b = 2.0
expert_count = 8
top_k = 2

total_parameters_b = shared_parameters_b + expert_count * expert_parameters_b
active_parameters_b = shared_parameters_b + top_k * expert_parameters_b

print("illustrative total parameters:", f"{total_parameters_b:.1f}B")
print("illustrative active parameters/token:", f"{active_parameters_b:.1f}B")
print("weights needed for residency:", f"{total_parameters_b:.1f}B")
print("raw BF16 weight storage:", f"{total_parameters_b * 2:.1f} GB")illustrative total parameters: 19.0B
illustrative active parameters/token: 7.0B
weights needed for residency: 19.0B
raw BF16 weight storage: 38.0 GBIf an MoE has 46.7B total parameters and 12.9B active parameters per token, which number drives FLOPs and which number drives memory residency?
Answer
Active parameters mostly drive per-token expert FLOPs. Total parameters drive checkpoint size and the amount of expert weight memory the serving system must keep available.
A top-k router you can run
The walkthrough hid the matrix multiply. Here the gate is an explicit matrix. For , returns its first column: the four logits above. The tiny experts below are fixed linear maps, not trained FFNs. They let us test selection and weighted output without loading a model or claiming GPU performance.
from math import exp, isfinite

def finite_float(value) -> float:
    if type(value) not in (int, float):
        raise ValueError("router values must be finite numbers")
    try:
        value = float(value)
    except OverflowError as error:
        raise ValueError("router values must fit a finite float") from error
    if not isfinite(value):
        raise ValueError("router values must be finite numbers")
    return value

def matvec(matrix: list[list[float]], vector: list[float]) -> list[float]:
    if not vector or any(len(row) != len(vector) for row in matrix):
        raise ValueError("gate rows must match the nonempty hidden dimension")
    values = [finite_float(value) for value in vector]
    return [sum(finite_float(weight) * value for weight, value in zip(row, values))
            for row in matrix]

def softmax(logits: list[float]) -> list[float]:
    if not logits:
        raise ValueError("logits must be nonempty")
    logits = [finite_float(score) for score in logits]
    peak = max(logits)
    unnormalized = [exp(score - peak) for score in logits]
    total = sum(unnormalized)
    return [value / total for value in unnormalized]

def topk_route(
    hidden: list[float],
    gate: list[list[float]],
    top_k: int,
) -> tuple[list[int], list[float]]:
    if type(top_k) is not int or not 1 <= top_k <= len(gate):
        raise ValueError("top_k must be between 1 and the expert count")
    logits = matvec(gate, hidden)
    probabilities = softmax(logits)
    selected = sorted(
        range(len(probabilities)),
        key=probabilities.__getitem__,
        reverse=True,
    )[:top_k]
    selected_total = sum(probabilities[index] for index in selected)
    weights = [probabilities[index] / selected_total for index in selected]
    return selected, weights

gate = [
    [-0.65, 0.0, 0.0, 0.0],
    [-1.77, 0.0, 0.0, 0.0],
    [-1.35, 0.0, 0.0, 0.0],
    [-3.00, 0.0, 0.0, 0.0],
]
hidden = [1.0, 0.0, 0.0, 0.0]
selected, weights = topk_route(hidden, gate, top_k=2)

print("logits:", [round(score, 2) for score in matvec(gate, hidden)])
print("selected experts:", [index + 1 for index in selected])
print("renormalized weights:", [round(weight, 2) for weight in weights])
print("weight sum:", round(sum(weights), 2))

# Each expert maps the four-dimensional input to four output coordinates.
def expert(index: int, x: list[float]) -> list[float]:
    maps = [[2, 0, 0, 0], [0, 0, 4, 0], [0, 3, 0, 0], [0, 0, 0, 5]]
    return [coefficient * x[0] for coefficient in maps[index]]

outputs = [expert(index, hidden) for index in selected]
blended = [sum(weight * output[j] for weight, output in zip(weights, outputs))
           for j in range(len(hidden))]
print("blended output:", [round(value, 3) for value in blended])
try:
    topk_route(hidden, gate, top_k=0)
except ValueError as error:
    print("invalid route rejected:", error)
for x, bad_gate, k in [
    (hidden, gate, True), (hidden, gate, 1.5),
    ([float('nan')], [[1.0], [0.0]], 1),
    ([1.0], [[float('inf')], [0.0]], 1),
    ([1.0], [[10**1000], [0.0]], 1),
    ([1e308], [[1e308], [0.0]], 1),
]:
    try:
        topk_route(x, bad_gate, k)
    except ValueError:
        pass
    else:
        raise AssertionError("invalid routing input accepted")
assert topk_route([1.0], [[1e308], [-1e308]], 1) == ([0], [1.0])logits: [-0.65, -1.77, -1.35, -3.0]
selected experts: [1, 3]
renormalized weights: [0.67, 0.33]
weight sum: 1.0
blended output: [1.336, 0.995, 0.0, 0.0]
invalid route rejected: top_k must be between 1 and the expert countThe exact-logit output differs slightly from using the rounded 0.52 and 0.26 probabilities by hand. Try top_k=4 to include all experts, then use a gate row with only three columns: the shape check should reject it rather than silently truncate a dot product. The assertions reject boolean/fractional expert counts, nonfinite values, unrepresentable integers, and dot-product overflow. Subtracting the maximum protects exponentiation; it doesn't repair an already-invalid projection. Ties in this tiny implementation select lower expert indices first because Python's sort is stable; a production kernel's tie rule may differ.
Mixtral and DeepSeek-V2 select multiple routed experts per token.[2][3] Changing a trained checkpoint's top- changes its computation and isn't a free serving knob: evaluate quality as well as compute, capacity, and communication.
What additional trade-off does top-2 routing introduce compared with top-1?
Answer
Top-2 lets a token blend two routed outputs, but it also executes and dispatches more expert work per token. Whether that trade improves quality or serving efficiency has to be measured for the architecture and hardware.
Alternative: expert choice routing
The standard top-k router forces each token to choose its top experts. Expert Choice Routing[5] flips the mechanism: each expert selects a fixed bucket of top-scoring tokens from the current batch.
Each expert processes a fixed token budget, so expert-side load is predictable and easier to schedule. Coverage moves to the token side: one token may land in many expert buckets, one bucket, or none unless the design adds coverage rules. Token-choice routing with balancing losses remains the simpler picture for open-weight MoE LLMs. Expert-choice routing still shows up in training-efficiency papers.
expert_buckets = {
    "E1": ["t0", "t1"],
    "E2": ["t0", "t2"],
    "E3": ["t2", "t3"],
}
all_tokens = {"t0", "t1", "t2", "t3", "t4"}
selected_tokens = [token for bucket in expert_buckets.values() for token in bucket]
uncovered = sorted(all_tokens - set(selected_tokens))

print("tokens per expert:", [len(bucket) for bucket in expert_buckets.values()])
print("t0 expert count:", selected_tokens.count("t0"))
print("uncovered tokens:", uncovered)tokens per expert: [2, 2, 2]
t0 expert count: 2
uncovered tokens: ['t4']What trade-off does expert choice routing make compared with token choice top-k routing?
Answer
Expert choice gives each expert a fixed token budget, so load balancing is easy. The risk moves to the token side: some tokens may get many experts while others may be skipped unless the design enforces coverage.
There is another dependency to check before using batch-wide expert choice in an autoregressive decoder. Hold an earlier token's score fixed, then add a higher-scoring future token to a one-slot expert bucket:
prefix = [('earlier', 0.6)]
extended = prefix + [('future', 0.9)]
for name, tokens in [('prefix', prefix), ('extended', extended)]:
    chosen = sorted(tokens, key=lambda item: item[1], reverse=True)[:1]
print(f"{name}: selected={[token for token, score in chosen]}")prefix: selected=['earlier']
extended: selected=['future']The earlier token loses its expert contribution even though its own score didn't change. This follows from selection across the bucket: a causal attention mask alone doesn't make that FFN routing causal. A decoder needs a routing/grouping policy that cannot depend on unavailable future tokens, plus checks for prefix and incremental-execution consistency. This fixture demonstrates the dependency, not a defect in a deployed expert-choice implementation.[5]
Why routers collapse without a balancing policy
During training, routers can drift toward expert collapse: many tokens route to a few popular experts while others starve. Load statistics tell you whether this is occurring. They don't prove that a perfectly uniform router is best for model quality.
Suppose four interchangeable experts start with nearly tied scores, but E1 wins slightly more often on common tokens. Predict the next step: more examples contribute to E1's task gradient, while cold experts see less training data. E1 can improve faster on the tokens it already sees, making that route more attractive. This is a possible feedback loop, not proof that any skewed batch is a collapsed model; many assignments can contribute to one optimizer update.
That feedback starves E2 through E4. After enough steps, E1 may take most assignments while the others stay under-trained. The model still reserves memory for all four experts, but that isn't a math expert plus three specialists. It's one overworked expert and three idle parameter blocks.
The histograms use the same 60 / 20 / 15 / 5 split as the numeric loss check later. Compare them with quality, overflow, and communication before you pick a balancing policy.
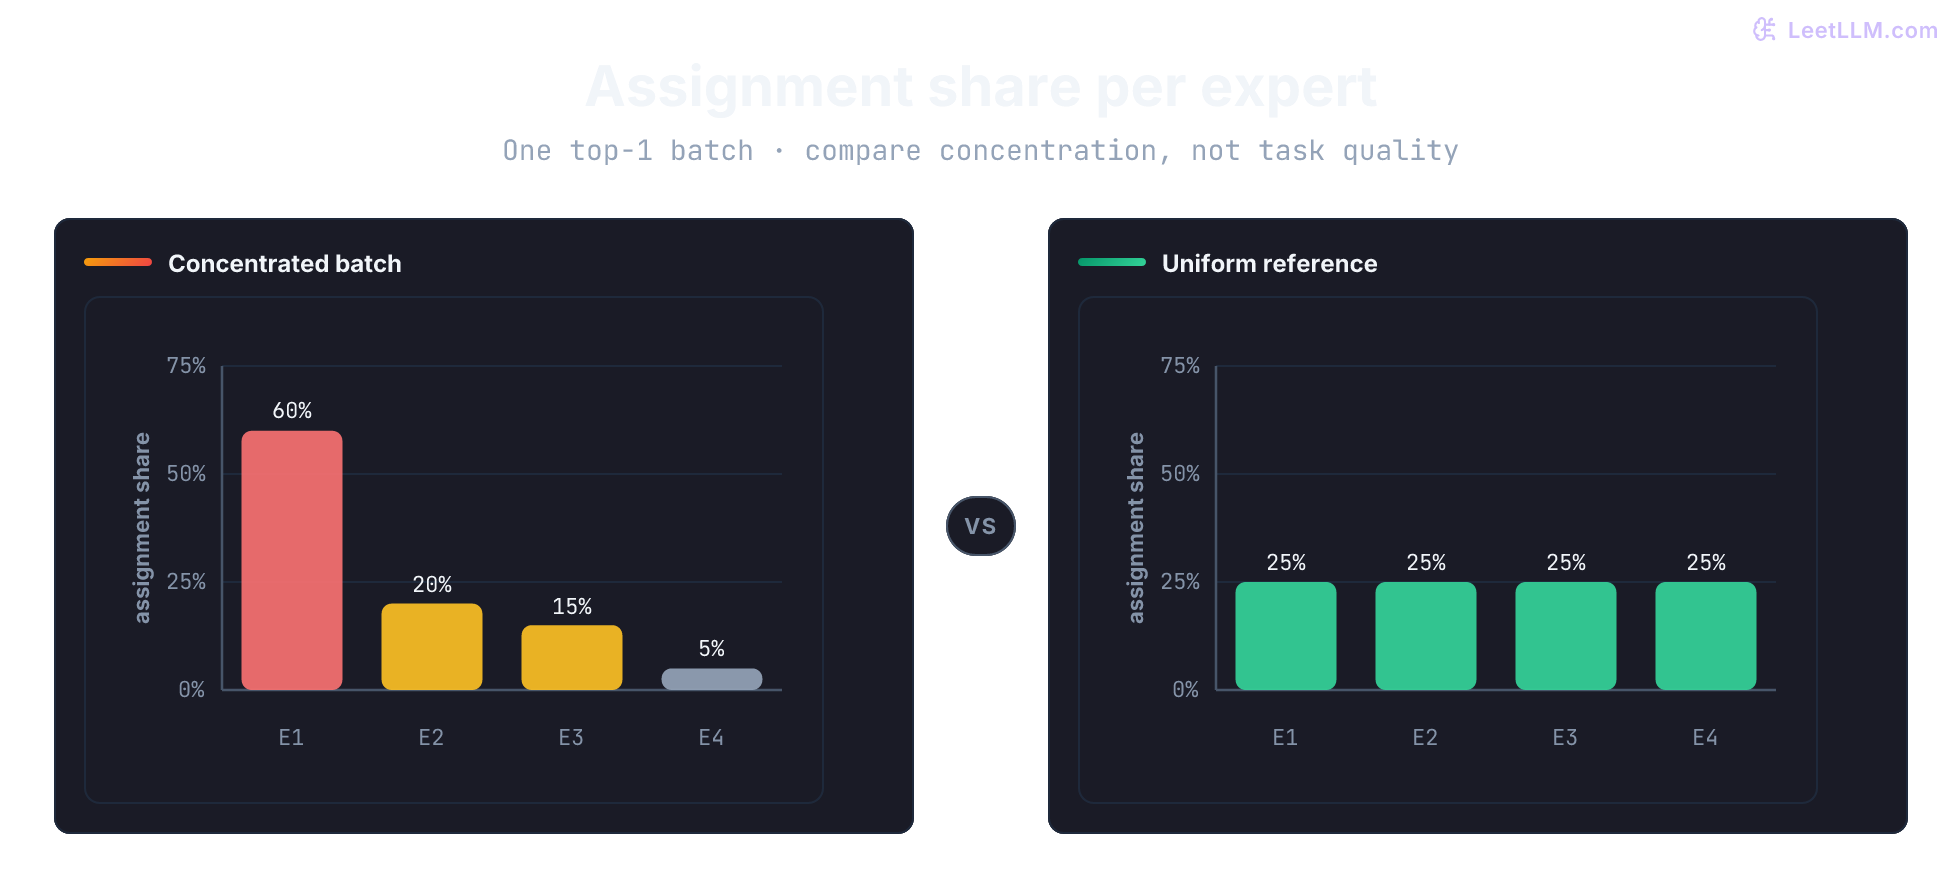
The router is trained jointly with the rest of the network.[1] Inspect assignment shares, overflow, task loss, and communication load together.
assignments = [0] * 12 + [1] * 4 + [2] * 3 + [3]
expert_count = 4
counts = [assignments.count(expert) for expert in range(expert_count)]
shares = [count / len(assignments) for count in counts]
max_share = max(shares)

print("assignment shares:", [round(share, 2) for share in shares])
print("flag for investigation:", max_share > 0.50)assignment shares: [0.6, 0.2, 0.15, 0.05]
flag for investigation: TrueWhy does expert collapse reinforce itself during training?
Answer
More assignments give the favored expert more training examples; it can improve faster and attract still more assignments. Cold experts receive less task-gradient signal. Compare this trend across steps with quality, rather than counting every token as a separate optimizer update.
An auxiliary load-balancing loss
How can a training run push back against that feedback loop? Switch Transformer combines the observed assignment fraction with the router's average probability for each expert.[4] If E1 receives 60% of tokens and 55% of probability mass, its contribution is 0.60 × 0.55 = 0.33. Sum those products, multiply by the expert count, then scale the penalty with a coefficient :
Multiply each expert's routed-assignment fraction by its average routing probability and sum them. If the router sends too many assignments to one expert (high ) and gives it high probability (high ), the product is large, so the loss penalizes that concentration.
Here:
- for Switch's top-1 rule, where is the number of tokens in the routing batch
- (average router probability)
- is a configurable coefficient (Switch reports experiments including )
- is the number of experts
A balanced reference point is , giving a loss of . It's a reference, not a task-quality metric. The hard assignment counts aren't differentiated; the gradient flows through the mean probabilities . Within a fixed assignment pattern, probability on a heavily used expert incurs a larger coefficient.[4]
For a top- illustration you can normalize over assignments, but libraries use different scaling and balancing scopes. Match the exact implementation before copying a loss coefficient. Neither this scalar nor a uniform histogram proves that every expert is useful.
Here's a concrete top-1 numeric check. Suppose we have 4 experts and a mini-batch of 100 tokens:
| Expert | (actual fraction) | (average prob) | Product |
|---|---|---|---|
| 1 | 0.60 | 0.55 | 0.330 |
| 2 | 0.20 | 0.22 | 0.044 |
| 3 | 0.15 | 0.15 | 0.0225 |
| 4 | 0.05 | 0.08 | 0.004 |
| Sum | 0.4005 |
If the load were perfectly uniform, each expert would get , and the sum would be . The current batch gives 4 × 0.4005 = 1.602 before multiplying by . Tune that coefficient with task quality, because balancing pressure can fight the language-modeling objective.
The auxiliary loss says "use the expert pool evenly enough." The language-modeling loss still decides whether the model predicts the next token well.
assignment_counts = [60, 20, 15, 5]
mean_router_probability = [0.55, 0.22, 0.15, 0.08]
expert_count = len(assignment_counts)
assignment_total = sum(assignment_counts)
fractions = [count / assignment_total for count in assignment_counts]

concentration = expert_count * sum(
    fraction * probability
    for fraction, probability in zip(fractions, mean_router_probability)
)
uniform_reference = expert_count * sum((1 / expert_count) ** 2 for _ in fractions)

print("scaled concentration:", round(concentration, 2))
print("uniform reference:", round(uniform_reference, 2))
print("difference from uniform reference:", round(concentration - uniform_reference, 2))scaled concentration: 1.6
uniform reference: 1.0
difference from uniform reference: 0.6Before using 1.0 as a pass/fail cutoff, try this feasible top-1 counterexample. Each row sums to one, and the winning expert is unambiguous:
rows = [[0.51, 0.09, 0.40], [0.09, 0.51, 0.40]]
winners = [max(range(3), key=row.__getitem__) for row in rows]
fractions = [winners.count(i) / len(rows) for i in range(3)]
mean_probability = [sum(row[i] for row in rows) / len(rows) for i in range(3)]
score = 3 * sum(f * p for f, p in zip(fractions, mean_probability))
print('assignment fractions:', fractions)
print(f'balance term / alpha: {score:.2f}')
print('every expert used:', all(f > 0 for f in fractions))assignment fractions: [0.5, 0.5, 0.0]
balance term / alpha: 0.90
every expert used: FalseThe third expert wins no token, yet the term is below the uniform reference. Thus 1.0 is neither a universal lower bound nor a coverage certificate for this dot-product loss. Its local gradients can encourage balancing without making the scalar a complete health metric. Inspect actual assignments, per-expert learning, overflow, and held-out quality.
In the load-balancing loss, what do and measure?
Answer
is the fraction of tokens assigned to expert under top-1; is its mean router probability. The loss differentiates through , not the hard assignment count. High values indicate concentration, not necessarily a capacity overflow.
Balancing asks how assignments are distributed on average. Capacity asks what happens when one batch is bursty and a hot expert fills its buffer.
Capacity factor and overflow policy
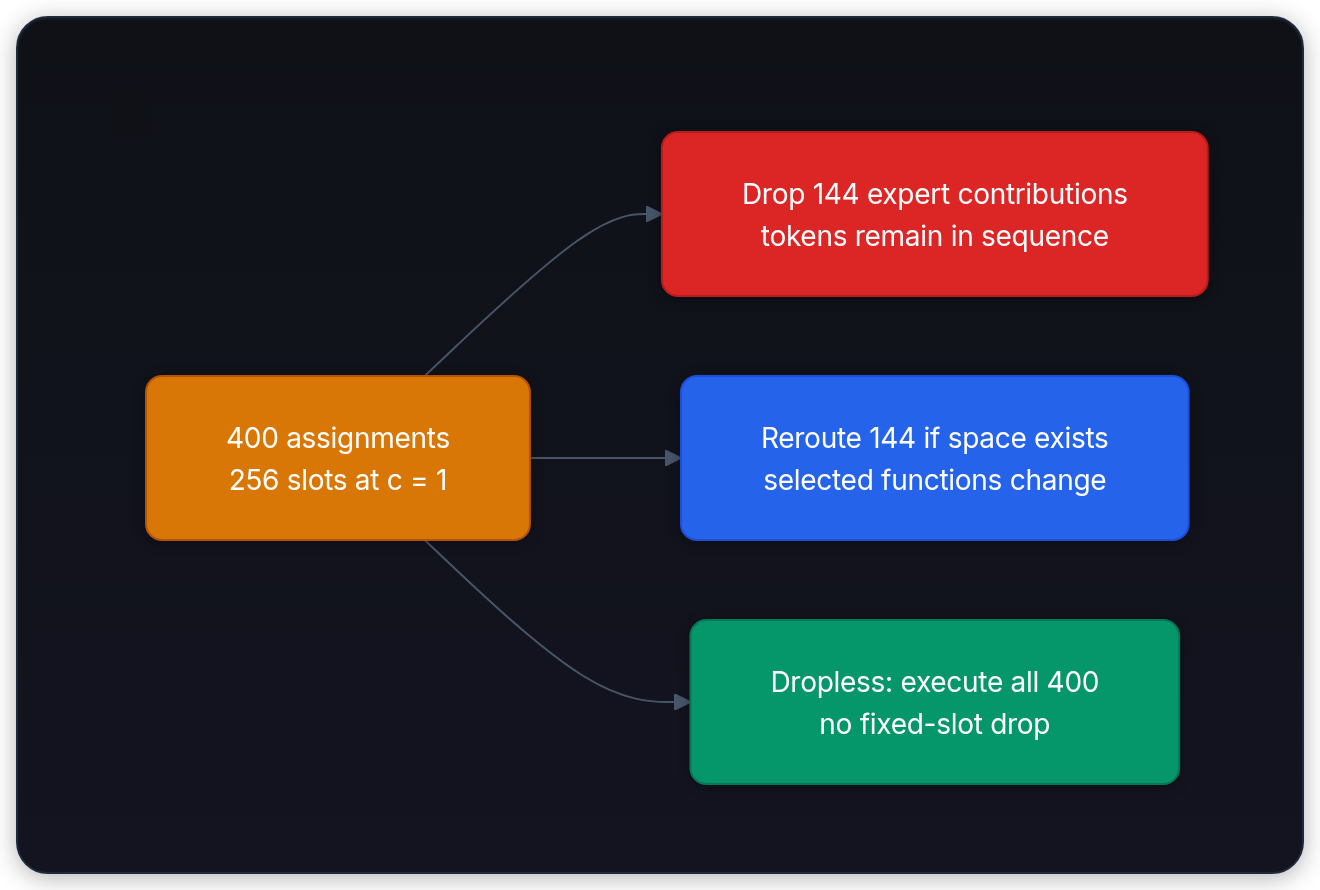
Start with a routing batch of 4096 tokens at one layer. Each chooses top-2 from 32 experts: 8192 assignments, averaging 256 per expert. At capacity factor 1.0, an expert assigned 400 tokens has 144 overflowed assignments. Those aren't necessarily 144 fully skipped tokens, because each token has another selected expert.
In a batched environment, many MoE implementations use fixed-size expert buffers so the layer can run predictable tensor operations. The capacity factor multiplies that uniform slot estimate:
Here counts tokens in this routing group, counts assignments per token, counts experts, and is the capacity factor. We round up to whole slots. A factor of 1.0 gives 256 slots here; 1.2 gives ceil(307.2) = 308. An implementation may add minimum capacities or padding multiples. Its routing group may be a microbatch or distributed group, not the entire training batch.[6]
What happens after an expert is assigned more tokens than its buffer allows depends on implementation:
- Dropping or pass-through: Switch-style designs can skip overflowed expert computations and rely on the residual path for those token-layer assignments.[4]
- Rerouting: A system can send overflow to another eligible expert if capacity exists there. This changes the selected function and may require recomputing blend weights.
- Dropless execution: A system can execute all assignments with variable work. Megatron Core supports dropless MoE as well as capacity-limited configurations; dropping isn't inherent to inference or MoE.[6]
A higher capacity factor reduces overflow for the same routes but reserves more buffer space. Padded execution may also compute empty slots. Dropping an assignment skips one expert contribution, not a token from the sequence; under top-1 the residual can carry that token onward without its expert update. Rerouting, dropping, and post-drop renormalization must match the model and runtime policy.
from math import ceil

tokens = 4096
top_k = 2
experts = 32
capacity_factor = 1.0
assigned_to_hot_expert = 400
capacity = ceil(tokens * top_k / experts * capacity_factor)
overflow = max(assigned_to_hot_expert - capacity, 0)

print("per-expert capacity:", capacity)
print("overflow assignments:", overflow)
print("drop keeps:", capacity, "skips:", overflow)
print("reroute keeps:", capacity, "sends elsewhere:", overflow)
print("dropless runs:", assigned_to_hot_expert)
print("capacity at factor 1.2:", ceil(tokens * top_k / experts * 1.2))per-expert capacity: 256
overflow assignments: 144
drop keeps: 256 skips: 144
reroute keeps: 256 sends elsewhere: 144
dropless runs: 400
capacity at factor 1.2: 308Why does a capacity factor of 1.2 reduce overflow risk versus 1.0, and what must you know when an expert is full?
Answer
1.2 gives each expert a 20% buffer above uniformly distributed assignments, reducing overflow. The result of overflow is an implementation policy: it may drop, reroute, or execute extra assignments, with different quality and throughput costs.
How modern architectures scale the idea
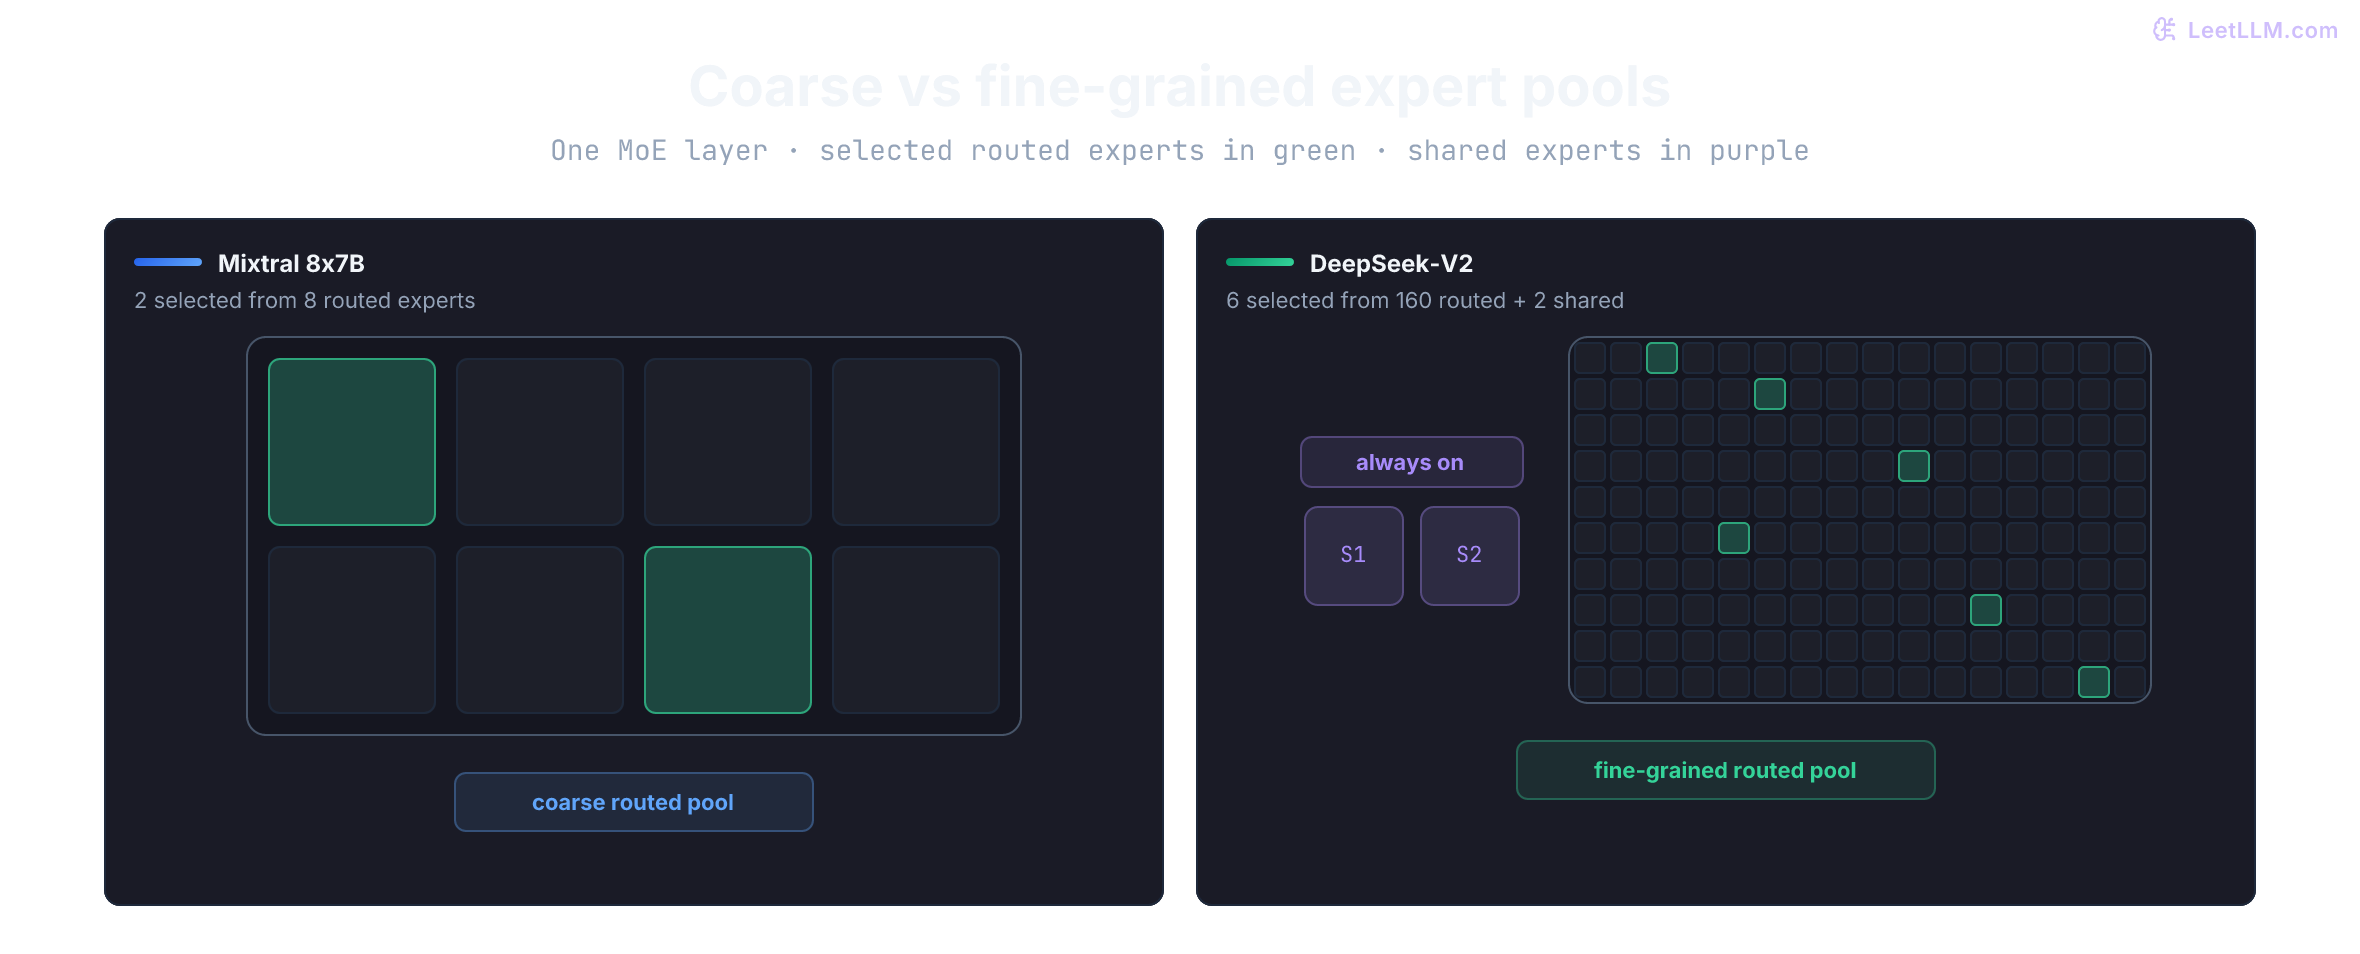
Routing, balance, and capacity interact. A larger pool may add useful capacity, but its experts must still train, fit somewhere, and receive their tokens. Mixtral keeps a small pool of wide experts; DeepSeek-V2 divides the work more finely. Relevant model-card/configuration selections below were checked on October 10, 2026. Counts illustrate architecture choices; they aren't quality rankings or complete artifact manifests.
Mixtral 8x7B[2]
| Property | Value |
|---|---|
| Total params | ~46.7B (paper rounds to 47B) |
| Active params | ~12.9B (paper rounds to 13B) |
| Experts | 8 |
| Top-K | 2 |
| Expert type | Standard FFN (SwiGLU activation[7]) |
MoE is applied only to the FFN layers. Attention stays shared. Mixtral uses a SwiGLU (Swish Gated Linear Unit) expert, a Gated Linear Unit (GLU) variant that improved Transformer quality in the GLU-variants paper.
DeepSeek-V2[3]
| Property | Value |
|---|---|
| Total params | 236B |
| Active params | 21B |
| Routed experts | 160 (fine-grained) |
| Shared experts | 2 (always-on) |
| Routed Top-K | 6 |
| Total active experts | 8 (6 routed + 2 shared) |
DeepSeek-V2 extends coarse-grained MoE in several ways:
- Fine-grained experts: 160 smaller routed experts instead of a handful of coarse experts, which gives the router many more combinations per token.[3]
- Shared experts: 2 experts are always active for all tokens. The design aims to capture common computation and reduce redundancy among routed experts.[3]
- Device-limited routing: selected routed experts for each token are constrained to at most three devices in the reported training configuration, limiting destination fan-out.[3]
- Multi-level balancing losses: expert-level, device-level, and communication-balance losses for cluster-scale routing.[3]
- Multi-head Latent Attention (MLA): retains compressed latent KV plus decoupled positional state; this is separate from FFN sparsity.[3]
The expert counts describe each MoE layer, not eight independent complete models. DeepSeek-V2's first layer uses a dense FFN. Its smaller expert widths also mean that "eight active experts" can't be compared with Mixtral's "two active experts" without counting parameters and operations.[3]
Cell counts in the comparison are exact. Tile sizes are schematic.
DeepSeek-V3[8]
DeepSeek-V3 keeps the DeepSeekMoE pattern at a larger reported scale. The first three layers stay dense FFNs; later layers are MoE. Compare it with the softmax walkthrough on two choices: how V3 selects routed experts and how it balances them.
| Property | Value |
|---|---|
| Total params | 671B |
| Active params | 37B |
| Routed experts | 256 |
| Shared experts | 1 |
| Routed Top-K | 8 |
| Total active experts | 9 (8 routed + 1 shared) |
| Main load balancing | Bias-adjusted auxiliary-loss-free strategy |
| Auxiliary guard | Sequence-wise balance loss |
| Other key component | Multi-head Latent Attention (MLA) |
Each MoE layer has 1 shared expert and 256 routed experts, with 8 routed experts activated per token.[8]
DeepSeek-V3 also changes scoring. It computes token-to-expert affinity with sigmoid scores, normalizes the selected scores, and adds a per-expert bias only when choosing the top- routed experts. Training adjusts that bias from observed expert load. The weighted expert output still uses the original affinity score, not the routing bias.[8]
The paper calls the main batch-wise mechanism auxiliary-loss-free because it doesn't rely on an auxiliary loss to keep expert load balanced across a training batch. It still keeps a small complementary sequence-wise balance loss to prevent extreme imbalance inside one sequence.[8] The softmax router you implemented is a teaching sketch, not a universal contract.
GLM-5.3 and DeepSeek V4 Flash 0731
These releases make stored-versus-active capacity impossible to ignore:
| Property | GLM-5.3 | DeepSeek V4 Flash 0731 |
|---|---|---|
| Vendor core-size label | 744B total / about 40B active[9] | 284B total / 13B active[10] |
| Routed experts per MoE layer | 256[11] | 256[10] |
| Routed experts per token | 8[11] | 6[10] |
| Shared experts | 1[11] | 1[10] |
These are core-model labels, not measured memory allocations. A released checkpoint can also include auxiliary modules: Flash 0731 attaches a DSpark speculative-decoding module.[12] Inspect the actual tensor files, dtypes, quantization metadata, and runtime buffers rather than multiplying a marketing label by two and calling it a complete memory budget.
Two V4 details change how you read the earlier softmax router. Every Transformer block is an MoE layer, and the first three use hash routing from token identity instead of a learned gate. Learned affinity scores use rather than V3's sigmoid, still with balancing bias and a small sequence-wise loss. V4 also removes the earlier limit on routing target nodes: device-limited routing is a design choice, not a universal DeepSeek rule.[10]
GLM-5.3's vendor reports the same base as GLM-5.2, with changes from post-training. Its pinned BF16 config has three initial dense FFNs, then 75 MoE layers, sigmoid scoring, selected-score normalization, and a routed scaling factor of 2.5.[13][11] A normalized selected sum can therefore receive an additional multiplier; don't assume every routed branch is a convex average or every block is MoE.
The similarly named GLM-5.3-Flash has a newly trained hybrid sparse/linear-attention backbone and a vendor label of 320B total/18B active.[14] Those labels alone don't determine its cache state or expert widths. Both routing and sequence mixing must match the exact checkpoint; inter-device communication, resident weights, and backend support still need separate checks.
Qwen3.6 sparse MoE checkpoint[15]
Qwen3.6 puts the active-versus-total split in the model name:
| Checkpoint | Total params | Activated params | MoE path | What the suffix means |
|---|---|---|---|---|
| Qwen3.6-35B-A3B | 35B | 3B | 256 experts, 8 routed + 1 shared | 35B total, about 3B active per token |
"A3B" hints at active compute, not full deployment footprint. You still need memory, sharding, quantization, or offload capacity for the full checkpoint, plus serving support for routing and grouped expert execution.
The backbone also interleaves Gated DeltaNet layers with gated attention. That is a sequence-mixer choice, not an FFN-routing choice, and it's the bridge into the next chapter.
What does DeepSeek-V2's fine-grained MoE add beyond "more experts"?
Answer
It uses many smaller routed experts, shared always-on experts, device-limited routing, and balancing policies designed for cluster-scale communication. The architecture problem is routing quality plus hardware efficiency, not parameter count alone.
The model comparisons answer how capacity is allocated. Serving adds a second question: can the runtime move, group, and execute those routed token states fast enough on its actual devices?
Serving an MoE on real hardware
Sparse compute per token doesn't remove the systems work. Experts often live on different devices, token states have to move, and decode microbatches re-expose that tax every step.
Communication overhead
In distributed training and inference, experts often reside on different devices to meet memory requirements. Routing a token to an expert on another GPU requires transferring the token's hidden state over a high-bandwidth interconnect such as NVLink within a node or InfiniBand across nodes.
That transfer can stall the layer. The usual pattern is an all-to-all dispatch that scatters tokens to the GPUs hosting their selected experts, then an all-to-all combine that returns expert outputs to the original token order. System designers try to overlap those transfers with useful compute so the network isn't the only thing running.
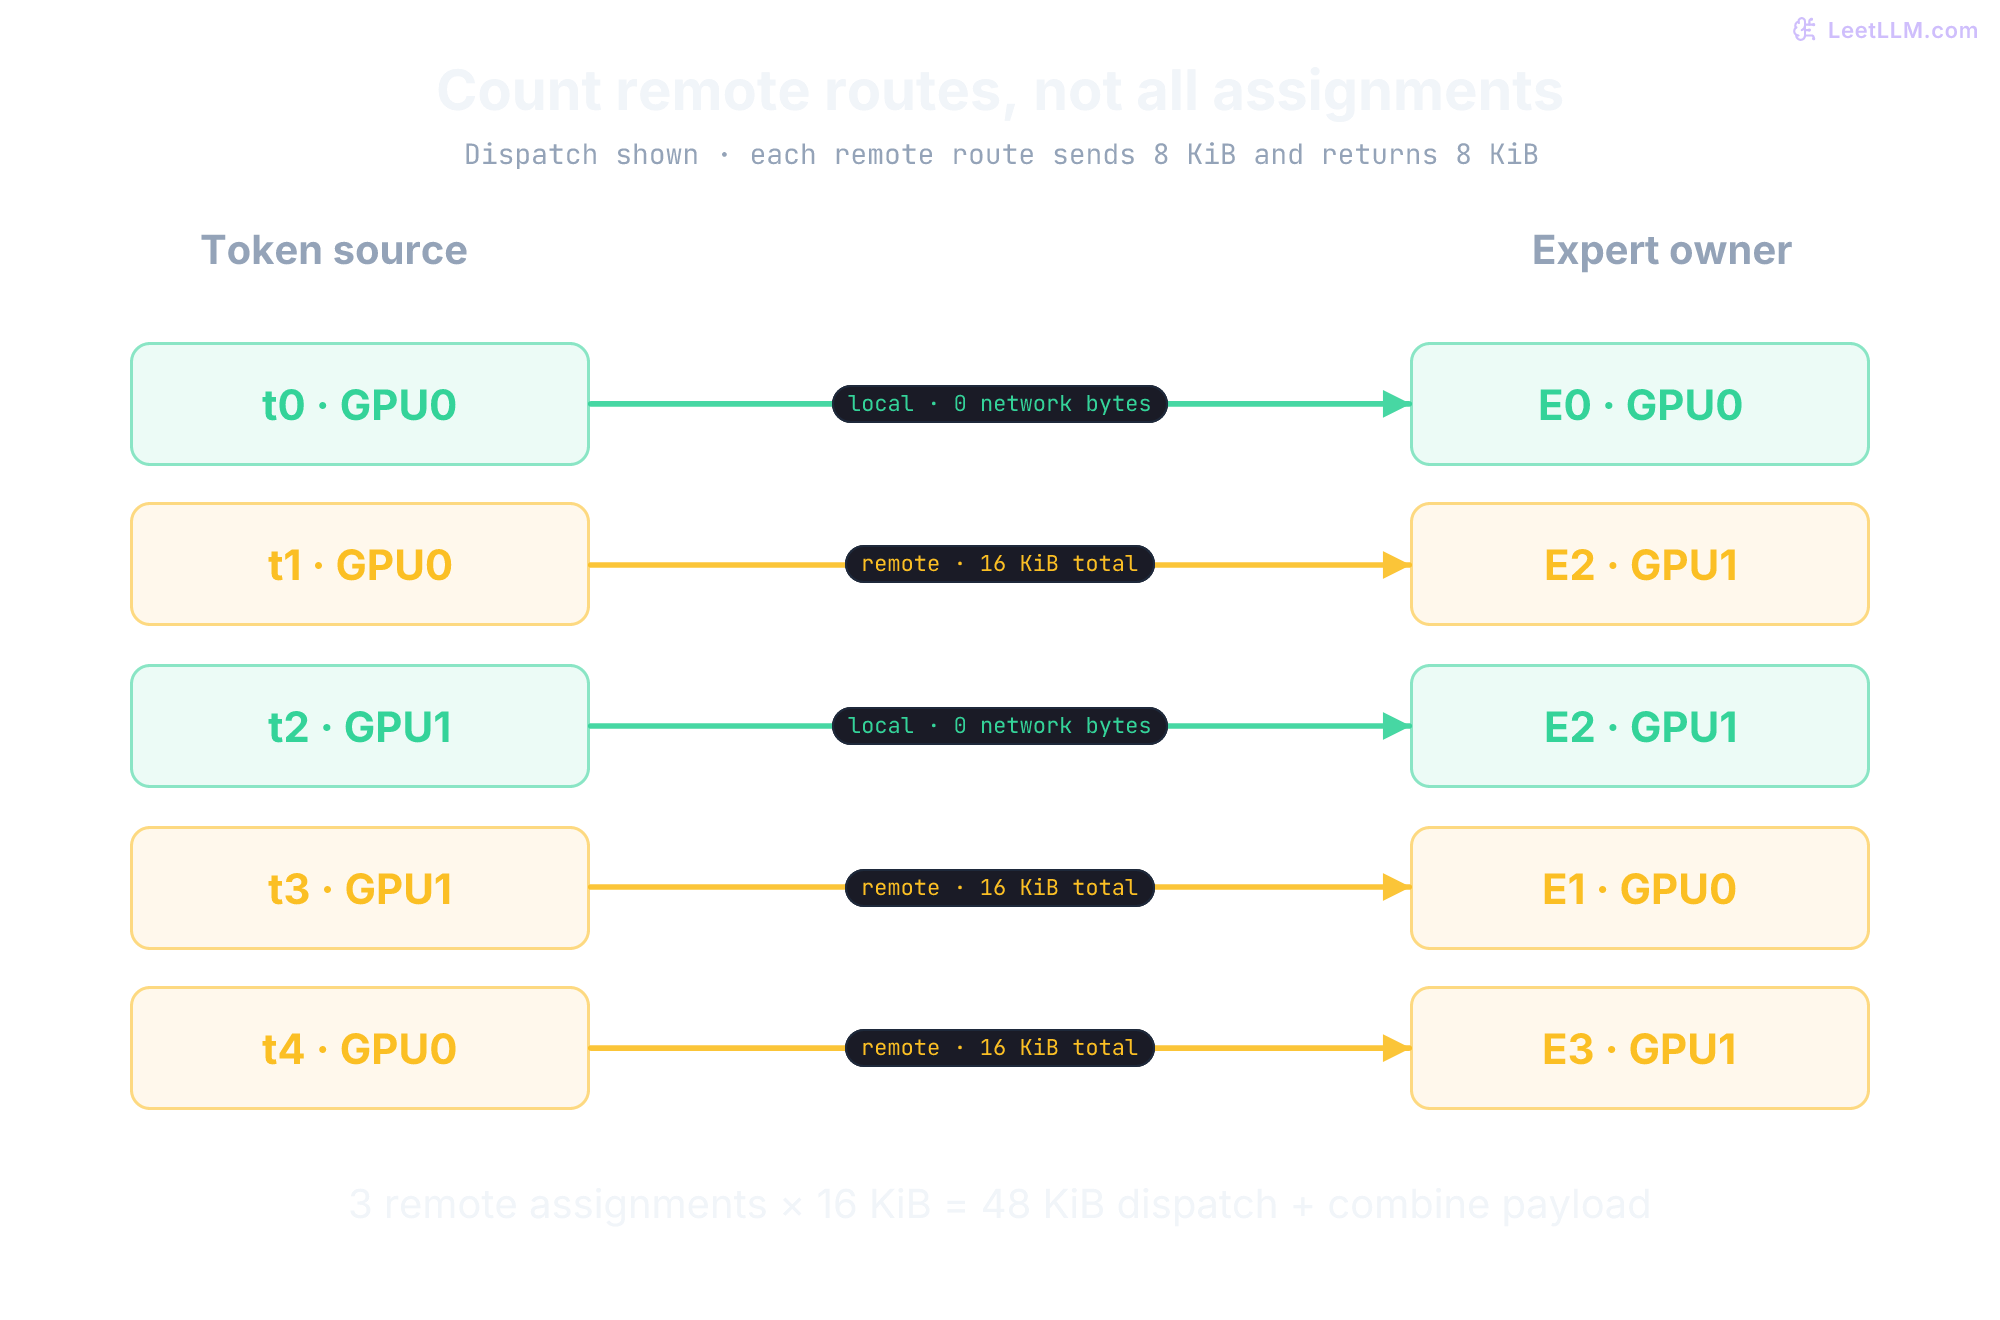
The next count uses four experts on two GPUs. Three of five assignments cross the link. Give each hidden state 4096 BF16 elements (2 bytes each) and return an output of the same size: each remote assignment moves 16 KiB across dispatch and combine. This counts application payload, not packet overhead or a measured collective.
expert_device = {"E0": "GPU0", "E1": "GPU0", "E2": "GPU1", "E3": "GPU1"}
routed_assignments = [
    ("GPU0", "E0"),
    ("GPU0", "E2"),
    ("GPU1", "E2"),
    ("GPU1", "E1"),
    ("GPU0", "E3"),
]
remote = sum(
    source_device != expert_device[expert]
    for source_device, expert in routed_assignments
)

print("routed assignments:", len(routed_assignments))
print("remote assignments:", remote)
print("remote rate:", f"{remote / len(routed_assignments):.0%}")
hidden_size, bytes_per_element = 4096, 2
payload_bytes = 2 * remote * hidden_size * bytes_per_element
print("dispatch + combine payload:", payload_bytes // 1024, "KiB")routed assignments: 5
remote assignments: 3
remote rate: 60%
dispatch + combine payload: 48 KiBMemory requirements
Unlike dense models with one FFN per layer, MoE models carry many expert FFNs. Fast GPU deployments generally keep those expert weights resident somewhere in the serving pool so routing doesn't stall on weight fetches.
Mixtral activates about 12.9B parameters per token, yet the serving system needs access to the full ~46.7B-parameter checkpoint.[2] The pool can be resident on one sufficiently large device, sharded across devices, or partly offloaded. None of those choices reduces its logical parameter count.
Tensor parallelism (TP) can shard the matrices of every expert across the same GPU group. Expert parallelism (EP) instead assigns different expert IDs to different device groups, then dispatches tokens to their owners. Within an EP group, an expert can itself be tensor-sharded. TP-only MoE is valid; EP is an additional layout choice, not a requirement for sparsity.[6]
If every expert is tensor-sharded across the same GPU group, is expert parallelism mandatory?
Answer
No. TP-only execution is valid. EP assigns different expert IDs to different groups and adds dispatch to the owning group. Which layout performs better depends on memory, matrix shapes, and communication.
Training instability
MoE training can be more sensitive than training a comparable dense Transformer. Top- selection introduces discontinuities, and early preferences can reinforce expert starvation. Selected experts and applicable gate weights still receive task gradients, but optimization must account for numerical precision, load balance, and task loss together.
Router z-loss[16] regularizes a quantity computed from routing logits; the ST-MoE paper reports improved training stability from this term. Input jitter is another candidate to test, but ST-MoE's XL-scale ablation improved stability while reducing quality.[16] Track training loss, routing distribution, overflow, and downstream quality rather than assuming one stabilizer is free.
Its exact per-token penalty is , averaged across tokens and multiplied by a coefficient. It isn't and isn't a load-balancing loss. Adding a common offset leaves softmax probabilities unchanged while changing log-sum-exp:
from math import exp, log

for name, offset in [('original', 0), ('shifted', 3)]:
    logits = [log(0.75) + offset, log(0.25) + offset]
    peak = max(logits)
    terms = [exp(z - peak) for z in logits]
    probabilities = [value / sum(terms) for value in terms]
    log_partition = peak + log(sum(terms))
    print(f'{name}: probabilities={[round(p, 2) for p in probabilities]}, '
f'z-loss={log_partition**2:.2f}')original: probabilities=[0.75, 0.25], z-loss=0.00
shifted: probabilities=[0.75, 0.25], z-loss=9.00The load and expert choice are unchanged. Z-loss regularizes this log-partition quantity, not each logit's absolute size independently: a very negative losing logit can contribute almost nothing to it. Numerical stability, load balance, and task quality are three checks, even when their training objectives interact.
Expert parallelism layout
Large distributed MoE deployments commonly use Expert Parallelism. TP splits individual matrix multiplications. EP maps entire experts to specific GPUs. Real deployments can combine EP with TP, sequence parallelism, data parallelism, and redundant expert placement. DeepSeek-V3 describes a decoding layout with TP4 for attention and EP320 for the MoE path.[8]
Serving snapshot, October 10, 2026: vLLM's EP guide documents expert ownership over its TP×DP ranks, phase-oriented communication backends, and an Expert Parallel Load Balancer (EPLB) that adjusts physical mappings using observed load. Redundant expert copies consume additional memory.[17] Moving or replicating the same learned expert differs from changing routing scores or top-: the latter changes the selected function. Check model/backend support and compare outputs when changing layout; the guide isn't a measurement on your workload.
The two-GPU sketch below matches the traffic snippet: GPU0 owns E0 and E1, GPU1 owns E2 and E3, and three of five token states cross the link. Expert weights don't migrate during this layer's dispatch.
At a larger 96-expert split the same ownership rule still holds:
GPU 0: Attention layers (shared) + Experts 0-31
GPU 1: Attention layers (shared) + Experts 32-63
GPU 2: Attention layers (shared) + Experts 64-95
Sizing EP traffic
For the simple scheme above, let be the fraction of assignments whose expert owner is remote. Dispatch sends one -element hidden state and combine returns one -element output per remote assignment, each with bytes per element:
The five-assignment fixture has , so the payload is 48 KiB; treating all five as remote would predict 80 KiB. With all-local routes, this network payload is zero even though local packing and memory traffic remain. This isn't a universal lower bound. Runtimes can send one token state per destination device rather than per expert, combine outputs before returning them, compress payloads, or add padding and metadata. Count the actual dispatch/combine protocol.
Now put two selected experts on the same remote device. Assume that device can apply both blend weights and return one combined output for the token:
remote_routes = [('t0', 'E2', 'GPU1'), ('t0', 'E3', 'GPU1')]
vector_bytes = 4096 * 2
per_assignment = 2 * len(remote_routes) * vector_bytes
token_destinations = {(token, device) for token, expert, device in remote_routes}
per_destination = 2 * len(token_destinations) * vector_bytes
print('separate expert messages:', per_assignment // 1024, 'KiB')
print('one message + combined return:', per_destination // 1024, 'KiB')separate expert messages: 32 KiB
one message + combined return: 16 KiBThe selected experts and expert FLOPs didn't change. The application protocol did. These are hypothetical payload counts, not measured wire traffic: routing metadata, scales, packing, padding, and synchronization can add costs. This is why a top- count alone cannot predict all-to-all bytes or latency.
Compare that payload with matrix multiplication (GEMM) work. For rows at one expert, hidden size , and intermediate size , two projections cost about FLOPs; a three-projection gated FFN costs about . Both count a multiply and add as two FLOPs and omit element-wise work. Small decode groups can expose launch and network latency even when payload bytes are modest.
Check expert and device loads at the same time scale. A long-run expert histogram can hide a burst of popular experts on one rank. Unequal expert placement or expert sizes can also make equal assignment counts unequal work. With equal-size experts, equal expert counts per rank, and exactly uniform simultaneous assignments, rank work is balanced too; don't diagnose a hotspot from that histogram alone.
Large prefill batches can amortize dispatch/combine across many tokens per expert. Decode microbatches re-expose router, grouping, and collective latency every step. State whether "batch size 1" means one prompt with thousands of prefill tokens or one decode token: they create very different expert matrix shapes.
Expert prefetching
For CPU-offloaded serving (for example, running a quantized MoE checkpoint on consumer hardware), one possible design is:
- Keep attention weights and router weights in GPU memory (always needed).
- Keep expert weights on CPU or SSD.
- After a layer's router decides which experts are needed, transfer those expert weights before its expert computation.
- Optionally use prediction or caching to stage likely later-layer experts, accepting misses or unused transfers.
This can make large MoE checkpoints fit where full GPU residency can't, especially when combined with weight quantization, but it trades memory for transfer-dependent latency. You can't know an exact next-layer route until that layer receives its hidden state, so unconditional "prefetch the next experts" isn't free.
Batch routing efficiency
In batch serving, different tokens in a batch may route to different experts. Batched expert execution is the serving trick:
- Router assigns all tokens in the batch to their top-k experts.
- Group tokens by expert assignment.
- Execute each expert as a batched matrix multiply over its assigned tokens.
- Scatter results back to original token positions.
That groups many per-token expert calls into larger matrix multiplies when enough assignments reach each expert. The following CPU dictionary groups five assignments; it doesn't execute a GEMM or benchmark a GPU.
from collections import defaultdict

routes = [
    ("t0", "E2"),
    ("t1", "E0"),
    ("t2", "E2"),
    ("t3", "E1"),
    ("t4", "E2"),
]
grouped = defaultdict(list)
for token, expert in routes:
    grouped[expert].append(token)

for expert in sorted(grouped):
print(expert, "batch tokens:", grouped[expert], "gemm rows:", len(grouped[expert]))E0 batch tokens: ['t1'] gemm rows: 1
E1 batch tokens: ['t3'] gemm rows: 1
E2 batch tokens: ['t0', 't2', 't4'] gemm rows: 3Grouping changes row order, so each assignment must retain its token index and blend weight. Use three token states with five assignments below. These fixed linear experts stand in for trained FFNs; routing is supplied rather than learned. Predict token 0's result: 0.25 × (0.5 x) + 0.75 × (-x) = -0.625 x.
from collections import defaultdict
from math import isclose

inputs = [[1., 2.], [3., 4.], [5., 6.]]
# token index, expert ID, selected gate weight
assignments = [(0, 2, .25), (1, 0, 1.), (2, 2, .6), (0, 1, .75), (2, 0, .4)]
scales = {0: 2., 1: -1., 2: .5}
groups = defaultdict(list)
for token, expert, weight in assignments:
    groups[expert].append((token, weight))

combined = [[0., 0.] for _ in inputs]
unweighted = [[0., 0.] for _ in inputs]
packed_token_order = []
for expert in sorted(groups):
    for token, weight in groups[expert]:
        output = [scales[expert] * value for value in inputs[token]]
        packed_token_order.append(token)
        for coordinate, value in enumerate(output):
            combined[token][coordinate] += weight * value
            unweighted[token][coordinate] += value

# Compare with the per-token sum, independent of expert grouping.
reference = [[sum(weight * scales[expert] * inputs[token][coordinate]
                  for index, expert, weight in assignments if index == token)
              for coordinate in range(2)] for token in range(len(inputs))]
assert all(isclose(a, b) for row, expected in zip(combined, reference)
           for a, b in zip(row, expected))
assert unweighted != combined
print("packed token order:", packed_token_order)
print("restored weighted rows:", [[round(v, 3) for v in row] for row in combined])
print("token 0 without gate weights:", unweighted[0])packed token order: [1, 2, 0, 0, 2]
restored weighted rows: [[-0.625, -1.25], [6.0, 8.0], [5.5, 6.6]]
token 0 without gate weights: [-0.5, -1.0]Appending packed outputs would return five assignment rows in order [1, 2, 0, 0, 2], rather than three token rows. Overwriting a token's destination would lose its other selected expert; summing without gate weights computes a different function. The assertion checks that grouping and weighted accumulation preserve the original per-token sum. Shared-expert and residual paths would be added separately. A real runtime may fuse weighting into expert execution, so verify that it happens exactly once, wherever implemented.[1][6]
Benchmark slices instead of memorizing a crossover:
| Measurement slice | What it exposes |
|---|---|
| One decode token per step | Small expert matrices and fixed routing/dispatch overhead |
| Moderate and large batches | How much grouped expert execution amortizes that overhead |
| Local versus remote expert routes | Cost of expert placement and all-to-all traffic |
| Strong versus weak interconnect | Whether network bandwidth changes the winner |
Exact outcomes depend on kernels, expert placement, interconnect, and request mix. MoE adds router computation, expert selection, token grouping, and sometimes all-to-all communication. Batching can amortize that overhead, but only measurements on the target system establish whether MoE wins latency or throughput.
Treat the next numbers as a fixture you would replace with benchmark output from the serving stack under evaluation.
These values are intentionally synthetic. For a real speed or latency claim, record accelerator and software versions, request shape and batch or concurrency, precision and kernel path, exact dense baseline, and a correctness check beside the measurement. Without that packet, 34.1% is a fixture result, not a portable benchmark.
dense = {"quality": 0.82, "p95_ms": 48, "tokens_per_second": 820}
moe = {"quality": 0.83, "p95_ms": 55, "tokens_per_second": 1100}
requirements = {"quality": 0.82, "max_p95_ms": 60, "min_tokens_per_second": 1000}

approved = (
    moe["quality"] >= requirements["quality"]
    and moe["p95_ms"] <= requirements["max_p95_ms"]
    and moe["tokens_per_second"] >= requirements["min_tokens_per_second"]
)

print("moe throughput improvement:", f"{moe['tokens_per_second'] / dense['tokens_per_second'] - 1:.1%}")
print("moe p95 delta ms:", moe["p95_ms"] - dense["p95_ms"])
print("candidate approved:", approved)moe throughput improvement: 34.1%
moe p95 delta ms: 7
candidate approved: TrueWhy can dense models beat MoE on single-request latency even when MoE has fewer active parameters?
Answer
MoE adds router work, token grouping, expert dispatch, and often all-to-all communication. With batch size 1, that overhead may dominate. Larger batches amortize it across many routed tokens.
The serving measurements expose the real tradeoff. Now turn them into a deployment choice instead of inferring a winner from active-parameter counts.
When MoE is worth the complexity
Test MoE when more stored capacity may improve quality at a similar active arithmetic budget. Keep a dense baseline, especially with small decode batches, weak interconnect, or a tight weight-memory budget. Those conditions motivate a comparison; they don't determine the winner before measurement.
| Decision signal | Dense is likely better | MoE is worth testing |
|---|---|---|
| Traffic shape | Low batch size, strict p95 latency | Large batches or offline throughput |
| Memory budget | One model must fit on a small fixed GPU set | Full checkpoint can be sharded, quantized, or offloaded |
| Network | All-to-all traffic already saturates links | Fast interconnect and device-aware routing are available |
| Quality target | Dense baseline already meets requirements | Extra capacity may improve harder tasks |
| Serving stack | Kernels lack grouped expert execution | Runtime supports routing, dispatch, combine, and expert placement |
| Observability | No routing, overflow, or per-expert metrics | You can inspect load balance, capacity, drops, and communication |
Don't stop at "this model activates fewer parameters." Ask whether the target workload still gains quality or throughput after full weight residency, routing overhead, interconnect cost, and operational visibility.
What is the fastest practical dense-vs-MoE check?
Answer
Compare dense and MoE on the real serving regime. Require quality to meet the bar, p95 latency to fit the product budget, throughput to justify the extra routing machinery, and memory residency to fit the deployment plan.
Diagnose the failure before changing the router
The 7B-active model doesn't fit a 14 GB budget
Return to the hypothetical 19B-total/7B-active worksheet. Two bytes per stored weight give 38 GB of raw payload, even though one token selects only 7B parameters. If you budgeted 14 GB from the active count, the missing expert pool is already enough to invalidate the plan. Actual VRAM also includes cache, scales, replicas, workspace, and allocator effects.
But an out-of-memory error doesn't prove that this was the cause. Was failure during loading, a long prefill, or concurrent decode? Inspect the artifact and phase-specific memory first. Quantizing weights, sharding experts, and shortening retained context change different terms; a cache change cannot shrink the checkpoint.
Uniform counts, worse answers
A uniform long-run histogram can coexist with bursty per-step overflow, uneven device work, unhelpful expert functions, or a precision regression. It doesn't identify which one happened. Save layer/rank assignment counts, executed contributions, overflow policy, and quality on the same cases. Separate training balance from serving placement and z-loss from either one.
If token coverage changed under expert choice, check which tokens lost every contribution. If capacity is fixed, check whether a partial top-2 route was dropped or renormalized. If ownership changed, inspect destination fan-out and per-rank work before modifying learned scores. A replicated expert can move work between ranks while preserving its learned function; rerouting to a different expert cannot assume that equivalence.
Faster throughput, slower interactive answers
The synthetic gate above approves 1,100 tokens/s and a 55 ms p95 against its chosen 60 ms budget. Change that budget to 50 ms: the candidate now fails despite the same 34.1% throughput gain. Those numbers describe a fixture, not a benchmark. On the real stack, distinguish one decode token from a long prefill, hold the request mix and quality requirement fixed, and measure delivery gaps, network waits, expert matrix shapes, and SLO-qualified capacity.
Finally, don't name a hot expert "the math expert" from one prompt. Mixtral's specified routing analysis found similar assignments across several domains and stronger syntax/locality patterns, including indentation and self.[2] A claimed specialty needs targeted routing and intervention evidence. Sparse arithmetic, useful capacity, and a story about specialization are different claims to investigate.