Personalize this lesson
Adapt explanations and teaching visuals to your background and preferred voice.
The CNN lesson computed feature maps while its kernel weights stayed frozen. Now we let the weights change. Start with a concrete model: it predicts 2 milliseconds of extra time to generate an LLM token when the server actually measures 6. How much should its weight and bias change after that mistake?
The correction has four linked jobs: compute the prediction, turn its miss into one scalar loss, send that loss slope back through the computation graph, and move parameters by a chosen step size. You already computed a slope and a downhill step for a latency model, then saw optimizer rules that reuse those slopes. Here, one running example lets you watch that arithmetic turn into a production training loop, then follow the same error through dense layers, ReLU activations, max-pool winners, and deep multi-layer stacks.
We'll use synthetic latency measurements so every single calculation is verifiable by hand. The input is a prompt-complexity score x; latency values are numerical measurements in milliseconds, and half-squared loss has units of milliseconds squared. These values teach optimization from first principles, letting you inspect every intermediate tensor and gradient buffer.
One update has four distinct jobs
When a model predicts poorly, four questions keep the parameter update interpretable: what did the current parameters predict, how wrong was that prediction, which parameters contributed to the error, and how far should they move?
| Step | What happens | Evidence you can inspect |
|---|---|---|
| Forward pass | Current parameters transform inputs into a prediction. | Print predicted delay . |
| Loss calculation | A scalar objective scores the error against a known target. | Print one non-negative scalar . |
| Backward pass | Derivatives measure how each parameter affects the loss. | Print and . |
| Parameter update | An optimizer shifts parameters along the negative gradient. | Recompute predictions and compare loss. |
Suppose a request has prompt-complexity score x = 2.0 and later measures y = 6.0 extra milliseconds of decode latency. We start with a linear latency model:
Here ("y hat") is the predicted delay, is the weight, and is the bias. Set initial parameters w = 1.0 and b = 0.0:
The prediction is 4.0 ms below the true target of 6.0 ms. Because the prediction is too low and x is positive, increasing either parameter will push the prediction closer to the target. Score the error with half squared error: square the -4.0 ms residual and multiply by 1/2 to get 8.0 square milliseconds. That extra 1/2 doesn't change the optimal ; it cancels the exponent when we differentiate:
The initial loss is:
What does a negative slope mean here? Nudge the prediction slightly upward, from 2.0 to 2.01 ms. Loss becomes 0.5 * (2.01 - 6.0)**2 = 7.96005, dropping by about 0.04 for a 0.01 ms nudge. The ratio of change is about -4.0: near this prediction point, each extra millisecond reduces loss by four square milliseconds.
Now compare how the weight and the bias affect that prediction. A 0.01 increase in bias moves the prediction by 0.01 ms. The same numerical increase in weight moves the prediction by x * 0.01 = 0.02 ms. The weight gradient, or loss sensitivity, is exactly twice the bias gradient:
The gradient is a local slope, not the step itself. Gradient descent subtracts a scaled gradient vector from the current parameters. When we estimate the full-dataset gradient from one randomly sampled example or mini-batch, the method is called stochastic gradient descent (SGD). With learning rate , the parameter updates are:
The revised prediction is 1.8 * 2.0 + 0.4 = 4.0 ms, and the loss falls from 8.0 to 0.5 * (4.0 - 6.0)**2 = 2.0. The two-millisecond prediction boost combines the weight change (0.8 * 2.0 = 1.6) and the bias change (0.4). We're updating internal parameters, not subtracting 0.1 * (-4.0) directly from the output prediction. Run this complete calculation in Python:
1x, target = 2.0, 6.0
2w, bias = 1.0, 0.0
3learning_rate = 0.1
4
5prediction = w * x + bias
6loss = 0.5 * (prediction - target) ** 2
7grad_prediction = prediction - target
8grad_w = grad_prediction * x
9grad_bias = grad_prediction
10
11new_w = w - learning_rate * grad_w
12new_bias = bias - learning_rate * grad_bias
13new_prediction = new_w * x + new_bias
14new_loss = 0.5 * (new_prediction - target) ** 2
15
16print(f"before: prediction={prediction:.1f} loss={loss:.1f}")
17print(f"gradients: dL/dw={grad_w:.1f} dL/db={grad_bias:.1f}")
18print(f"after: prediction={new_prediction:.1f} loss={new_loss:.1f}")1before: prediction=2.0 loss=8.0
2gradients: dL/dw=-8.0 dL/db=-4.0
3after: prediction=4.0 loss=2.0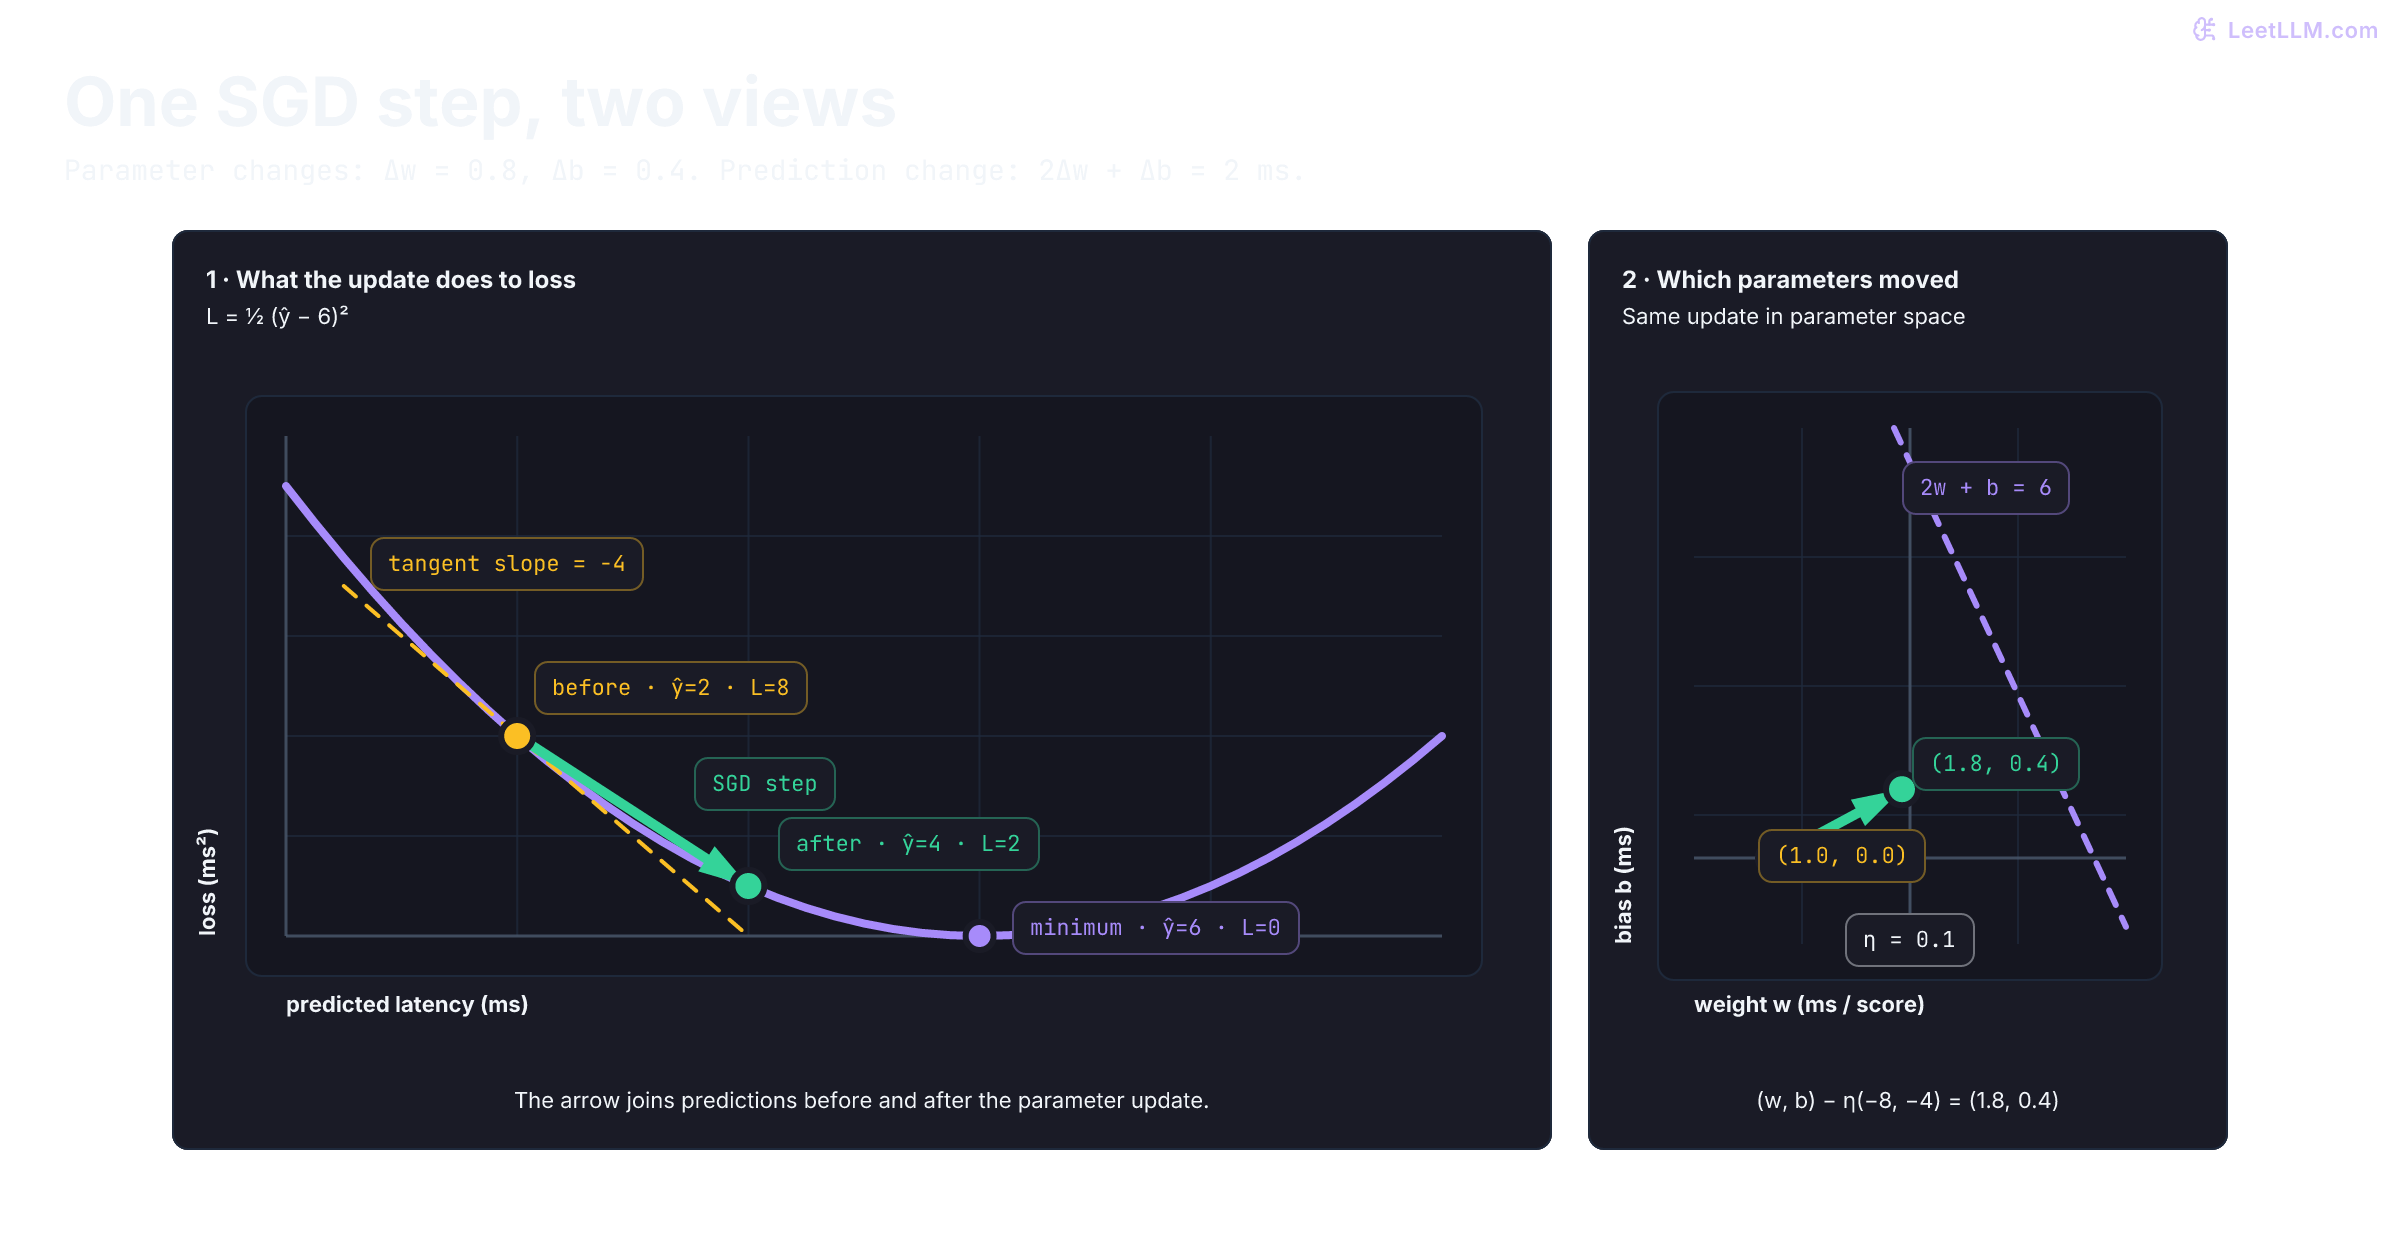
One update cuts our error in half. If we run the update rule repeatedly, the prediction continues approaching 6.0 and the loss continues shrinking toward zero:
1x, target = 2.0, 6.0
2w, bias = 1.0, 0.0
3learning_rate = 0.1
4
5for step in range(5):
6    prediction = w * x + bias
7    loss = 0.5 * (prediction - target) ** 2
8    error = prediction - target
9    w -= learning_rate * error * x
10    bias -= learning_rate * error
11 print(f"step {step}: before prediction={prediction:.3f} loss={loss:.3f}; after w={w:.3f} b={bias:.3f}")1step 0: before prediction=2.000 loss=8.000; after w=1.800 b=0.400
2step 1: before prediction=4.000 loss=2.000; after w=2.200 b=0.600
3step 2: before prediction=5.000 loss=0.500; after w=2.400 b=0.700
4step 3: before prediction=5.500 loss=0.125; after w=2.500 b=0.750
5step 4: before prediction=5.750 loss=0.031; after w=2.550 b=0.775The error shrinks each step because each new prediction changes the gradient slope. The learning rate stayed fixed; the error signal being scaled became progressively smaller. That makes the choice of learning rate our next critical question.
Step size can rescue or wreck learning
The gradient points uphill toward increasing loss; its negative points locally downhill. The learning rate scales that downhill step. A tiny rate crawls. A balanced rate settles cleanly. An aggressive rate jumps past the minimum and causes the loss to explode.
We can analyze this mathematically for our single-example model. Updating both parameters changes the prediction by:
where is the prediction residual. The new residual becomes:
For , , so . The contraction factor dictates convergence:
- If , : the residual halves every single step.
- If , : the model lands on the exact target in one step.
- If , : the residual flips sign but maintains its magnitude (
-4.0becomes+4.0), oscillating indefinitely without improving. - If , : the residual flips sign and expands by every iteration, diverging to infinity.
Let's test all three behaviors in code:
1def train_for_five_steps(learning_rate: float) -> list[float]:
2    x, target = 2.0, 6.0
3    w, bias = 1.0, 0.0
4    losses = []
5    for _ in range(5):
6        prediction = w * x + bias
7        error = prediction - target
8        losses.append(0.5 * error ** 2)
9        w -= learning_rate * error * x
10        bias -= learning_rate * error
11    return losses
12
13for rate in (0.01, 0.1, 0.5):
14    losses = train_for_five_steps(rate)
15    formatted = ", ".join(f"{loss:.3f}" for loss in losses)
16 print(f"lr={rate:.2f}: {formatted}")1lr=0.01: 8.000, 7.220, 6.516, 5.881, 5.307
2lr=0.10: 8.000, 2.000, 0.500, 0.125, 0.031
3lr=0.50: 8.000, 18.000, 40.500, 91.125, 205.031A single training point can't pin down unique parameters: every pair satisfying yields zero loss. We'll introduce batches of varied requests shortly to break that symmetry.
Backpropagation assigns credit through a graph
One weight and one bias are easy to differentiate by hand. Real models can contain billions of parameters, so perturbing each parameter separately to compute numerical slopes would require at least one additional forward evaluation per parameter. That's intractable. Backpropagation is reverse-mode automatic differentiation: run the forward pass once to record intermediate values, then push derivatives backward from one scalar loss to every parameter in a single sweep.[1][2]
With one scalar loss and millions of parameters, reverse mode shares intermediate activations across all parameter paths. Its compute cost scales with the operations in the forward graph, avoiding a separate forward pass per parameter.[1] Rumelhart, Hinton, and Williams showed how error-driven reverse propagation trains multi-layer representations that would otherwise be impossible to coordinate.[3][4]
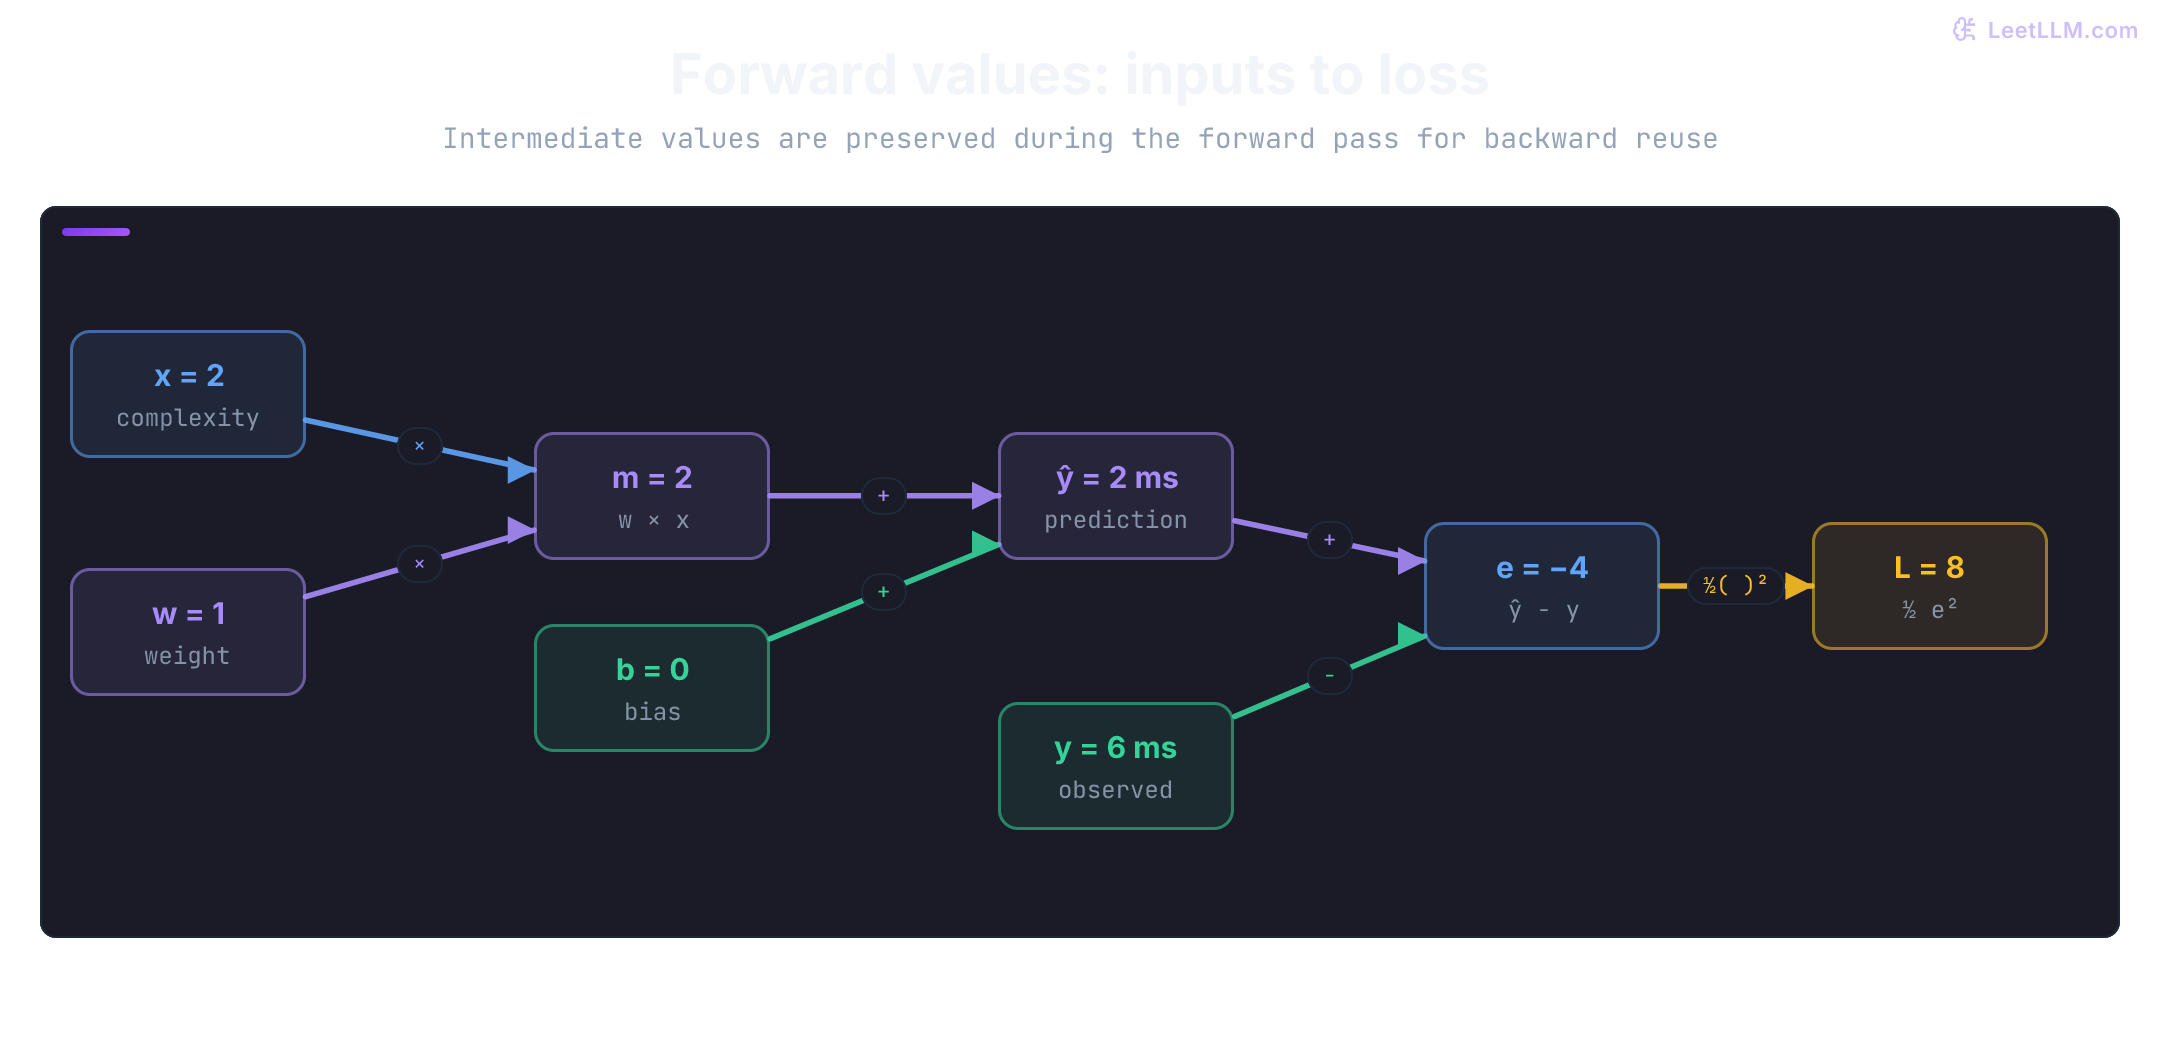
Before tracking backward derivatives, inspect what the forward pass stores: the intermediate product m = w * x, the prediction , and the residual . The decode-latency graph lets us inspect each node directly:
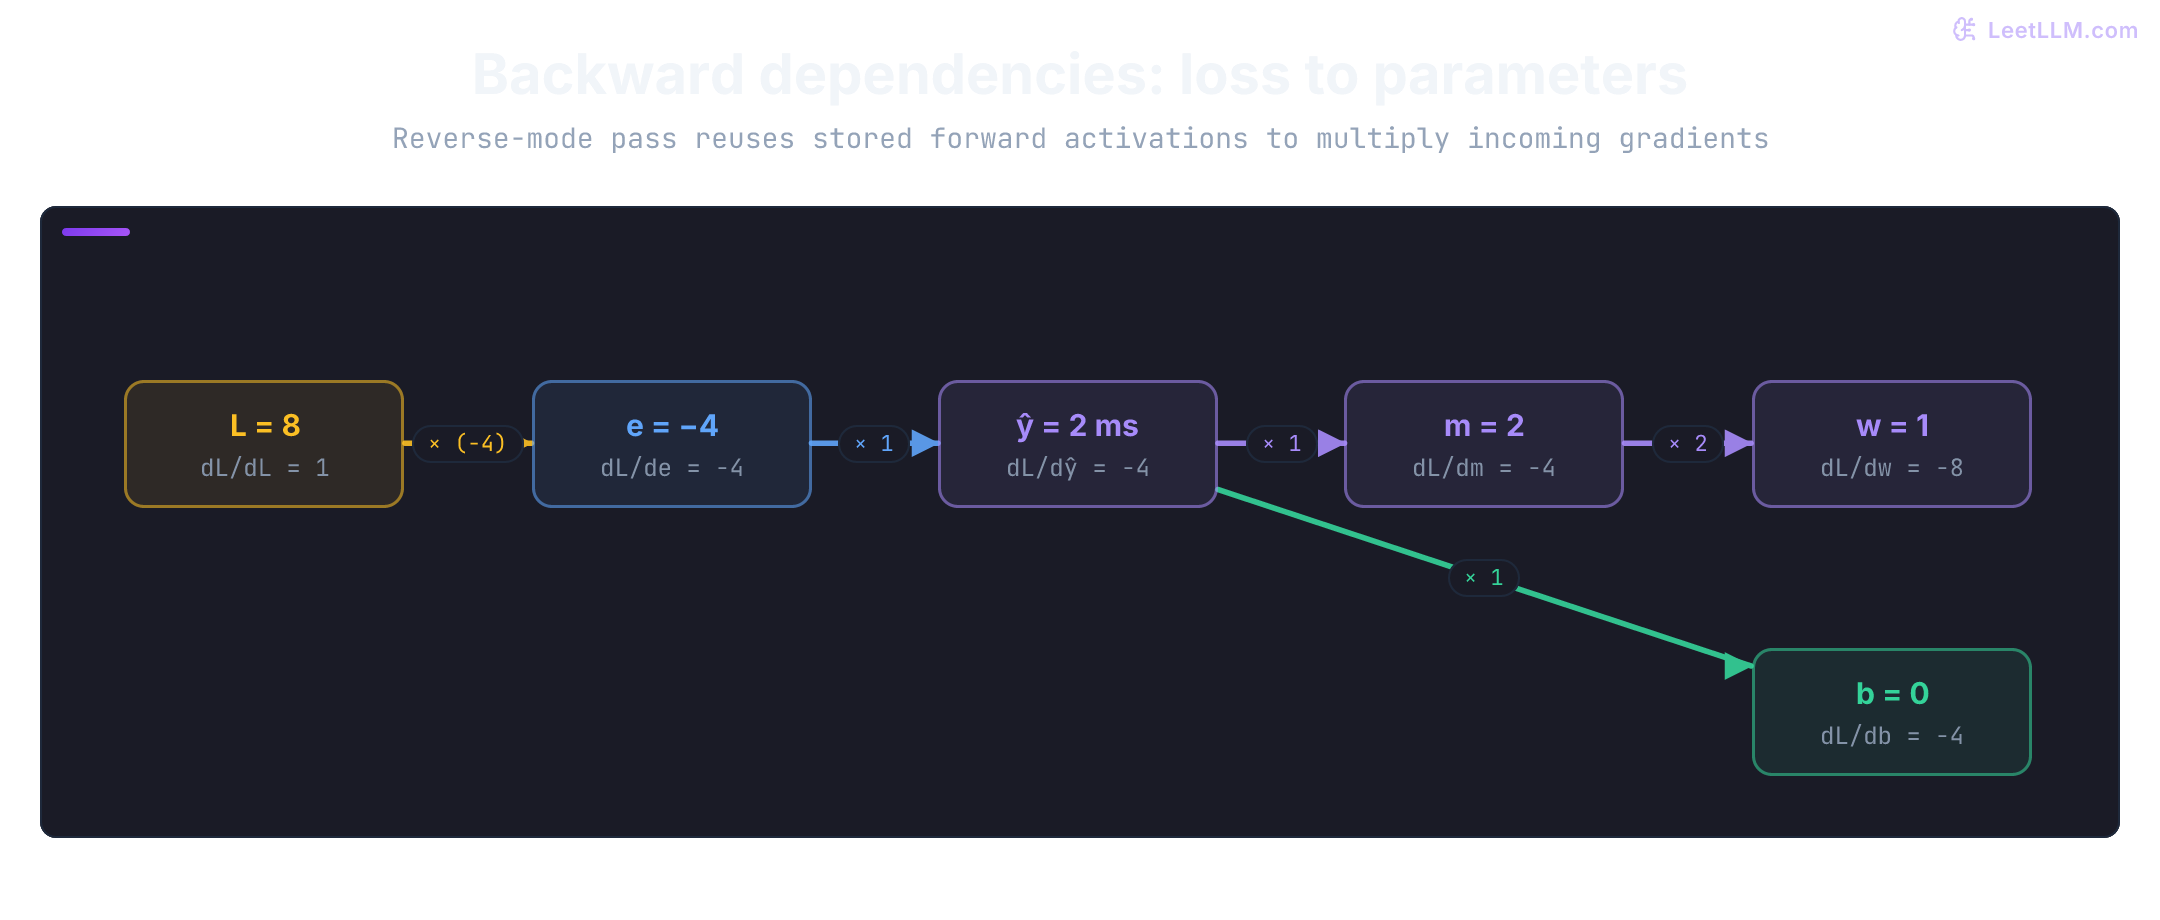
Start at the loss. The seed derivative at the root is . The chain rule multiplies that seed by each local derivative along the path to every parameter:
Whenever you write a custom backward pass, test your analytical derivatives against centered finite differences. Numerical differentiation is too slow for actual training, but it's the standard tool to verify analytical gradients before deploying them:[5]
1x, target = 2.0, 6.0
2w, bias = 1.0, 0.0
3epsilon = 1e-5
4
5def loss_at(weight: float, intercept: float) -> float:
6    prediction = weight * x + intercept
7    return 0.5 * (prediction - target) ** 2
8
9analytic_w = (w * x + bias - target) * x
10analytic_bias = w * x + bias - target
11numeric_w = (loss_at(w + epsilon, bias) - loss_at(w - epsilon, bias)) / (2 * epsilon)
12numeric_bias = (loss_at(w, bias + epsilon) - loss_at(w, bias - epsilon)) / (2 * epsilon)
13
14print(f"dL/dw analytic={analytic_w:.6f} numeric={numeric_w:.6f}")
15print(f"dL/db analytic={analytic_bias:.6f} numeric={numeric_bias:.6f}")
16print("checks pass:", abs(analytic_w - numeric_w) < 1e-8 and abs(analytic_bias - numeric_bias) < 1e-8)1dL/dw analytic=-8.000000 numeric=-8.000000
2dL/db analytic=-4.000000 numeric=-4.000000
3checks pass: TrueFinite differences require numerical discipline: a perturbation that's too large samples surface curvature rather than the tangent slope, while one that's too tiny loses precision to floating-point roundoff. Use double precision (float64) for gradient checks and avoid points where derivatives are discontinuous (like ReLU at zero).[6]
Build a scalar autograd engine
Andrej Karpathy's Micrograd captures autograd bookkeeping in a compact executable engine: each object stores a scalar value, its accumulated gradient, its parent references, and a local backward closure.[7] Tensor libraries apply this exact pattern across high-dimensional arrays. Building a scalar engine keeps the mechanics transparent.
For our model and half-squared loss , every operation implements one local derivative rule:
| Operation | Forward expression | Local backward closure |
|---|---|---|
| Addition | out = left + right | left.grad += out.grad, right.grad += out.grad |
| Multiplication | out = left * right | left.grad += right.data * out.grad, right.grad += left.data * out.grad |
| Power | out = val ** p | val.grad += p * (val.data ** (p - 1)) * out.grad |
Two structural rules govern the engine:
- Topological ordering: The backward sweep must visit an output node before visiting any of its parent inputs. We build a directed graph from the loss root, perform a depth-first search, and reverse the topological order.
- Gradient accumulation: Parent gradients must use
+=, not=. When a variable feeds multiple downstream operations, its total gradient is the sum of derivatives along all paths (multivariable chain rule).
1class Value:
2    def __init__(self, data, parents=(), operation=""):
3        self.data = float(data)
4        self.grad = 0.0
5        self.parents = tuple(parents)
6        self.operation = operation
7        self._backward = lambda: None
8
9    def __add__(self, other):
10        other = other if isinstance(other, Value) else Value(other)
11        out = Value(self.data + other.data, (self, other), "+")
12        def backward():
13            self.grad += out.grad
14            other.grad += out.grad
15        out._backward = backward
16        return out
17
18    __radd__ = __add__
19
20    def __mul__(self, other):
21        other = other if isinstance(other, Value) else Value(other)
22        out = Value(self.data * other.data, (self, other), "*")
23        def backward():
24            self.grad += other.data * out.grad
25            other.grad += self.data * out.grad
26        out._backward = backward
27        return out
28
29    __rmul__ = __mul__
30
31    def __neg__(self):
32        return self * -1.0
33
34    def __sub__(self, other):
35        return self + (-other)
36
37    def __pow__(self, exponent):
38        out = Value(self.data ** exponent, (self,), f"**{exponent}")
39        def backward():
40            self.grad += exponent * (self.data ** (exponent - 1)) * out.grad
41        out._backward = backward
42        return out
43
44    def backward(self):
45        order = []
46        seen = set()
47        def visit(node):
48            if node not in seen:
49                seen.add(node)
50                for parent in node.parents:
51                    visit(parent)
52                order.append(node)
53        visit(self)
54        self.grad = 1.0
55        for node in reversed(order):
56            node._backward()
57
58x, target = Value(2.0), Value(6.0)
59w, bias = Value(1.0), Value(0.0)
60prediction = w * x + bias
61loss = 0.5 * (prediction - target) ** 2
62loss.backward()
63
64print(f"prediction={prediction.data:.1f} loss={loss.data:.1f}")
65print(f"dL/dw={w.grad:.1f} dL/db={bias.grad:.1f}")1prediction=2.0 loss=8.0
2dL/dw=-8.0 dL/db=-4.0The autograd engine matches our hand calculations exactly. Now consider a shared variable: in with , what is ? Mathematically, . Because feeds both multiplication inputs, the backward closure fires for both operands. An engine that assigns with = would overwrite the first contribution with 3.0. Using += sums both paths to 6.0:
1a = Value(3.0)
2squared = a * a
3squared.backward()
4print(f"a*a={squared.data:.1f}")
5print(f"d(a*a)/da={a.grad:.1f}")1a*a=9.0
2d(a*a)/da=6.0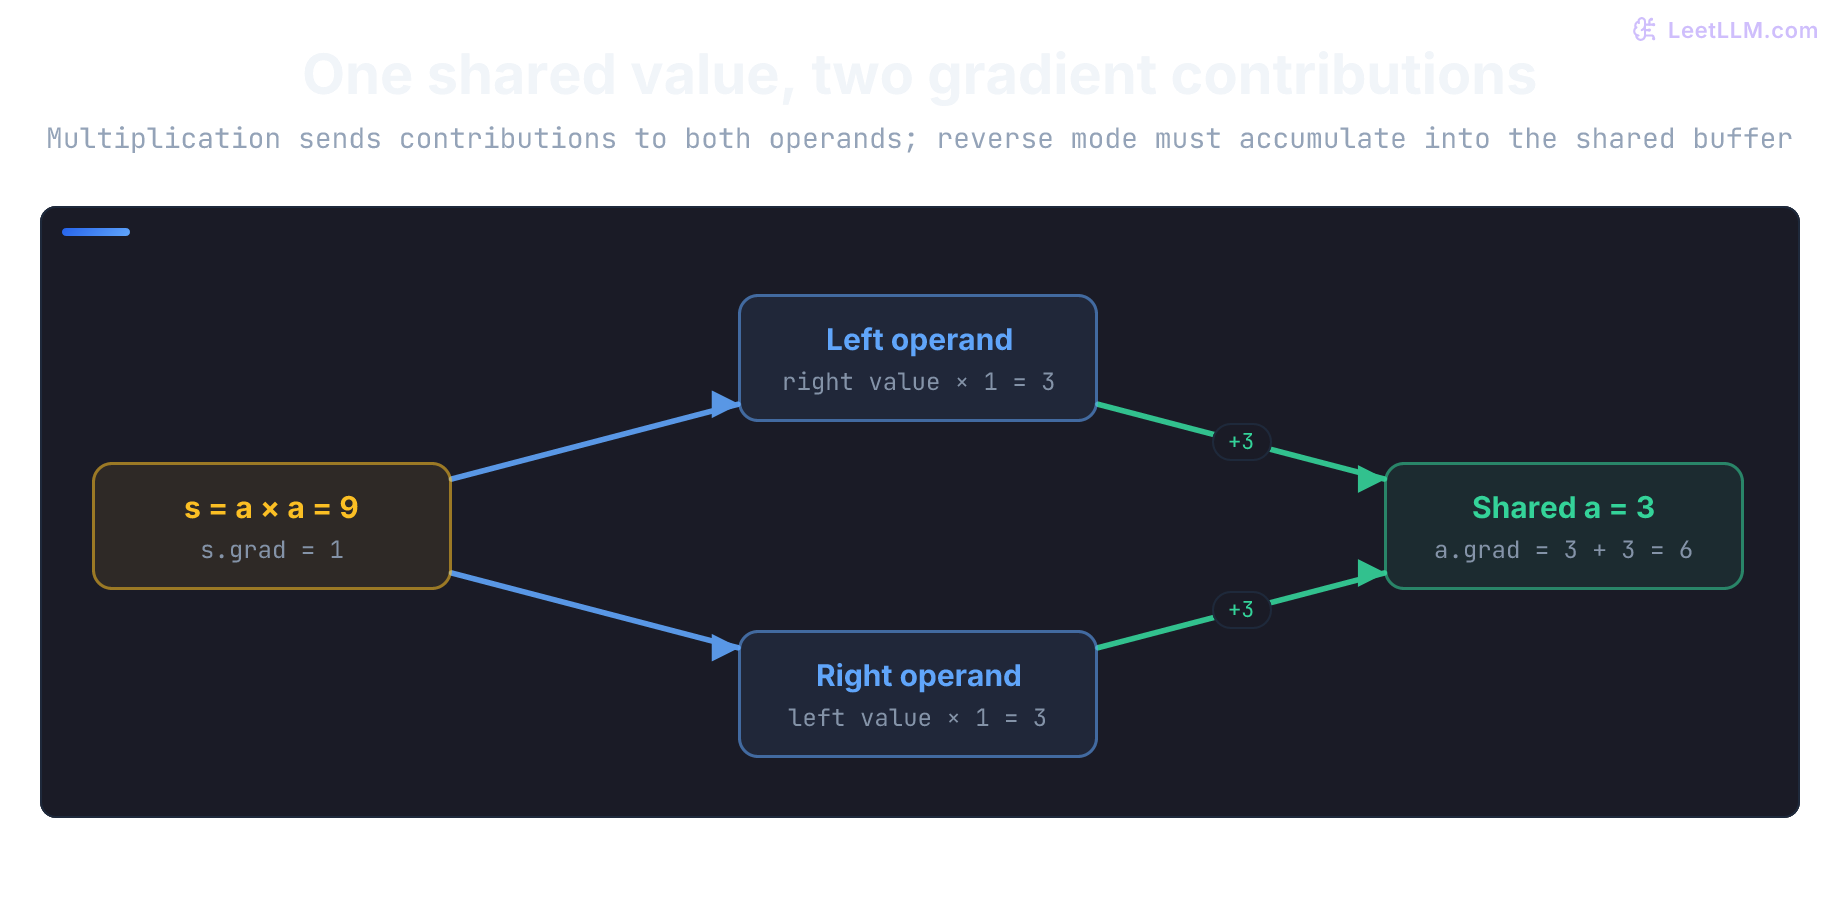
Tensor libraries follow this exact accumulation contract. Parameter .grad buffers persist until explicitly cleared. That behavior enables intentional gradient accumulation across micro-batches, but it means un-cleared buffers will silently corrupt future training steps.
Local backward rules for dense layers, activations, and pooling
Multilayer networks compose simple vector operations. Each layer receives an upstream error gradient from the layer above and computes two items: gradients for its own parameters, and the downstream error signal to pass to the preceding layer.
Dense layer backward
For a dense linear transformation with incoming gradient :
- Weight gradient is the outer product: (shape matches ).
- Bias gradient is the upstream signal itself: .
- Input gradient routes signal backward: (shape matches ).[4]
ReLU backward
ReLU is .[8] Its backward rule checks whether the input was active during the forward pass:
If , the gradient passes through unchanged. If , the gradient is multiplied by zero. A unit that remains negative across all training examples is a "dead ReLU" and receives zero gradient updates.
Max-pooling backward
Max pooling extracts the maximum value within each spatial window and saves the coordinates of that winner during the forward pass. The backward rule routes the incoming pooled gradient exclusively to the saved winning coordinate. All non-winning locations receive a gradient of zero:
1x = [2.0, 1.0]
2weight = [[0.5, -0.2], [0.1, 0.4]]
3delta = [-1.5, 0.5]
4
5dW = [[d * xi for xi in x] for d in delta]
6db = list(delta)
7dx = [sum(weight[i][j] * delta[i] for i in range(len(delta))) for j in range(len(x))]
8print("dW", dW)
9print("db", db)
10print("dx", dx)
11
12z_relu = [-1.0, 2.0]
13up = [3.0, 4.0]
14dz = [u * (1.0 if z > 0 else 0.0) for z, u in zip(z_relu, up)]
15print("ReLU dz", dz)
16
17feature = [
18    [0.10, 0.42, 0.18, 0.30],
19    [0.25, 0.91, 0.44, 0.12],
20    [0.08, 0.21, 0.77, 0.55],
21    [0.16, 0.14, 0.32, 0.49],
22]
23winners = []
24for row_start in (0, 2):
25    for col_start in (0, 2):
26        cells = [(r, c) for r in range(row_start, row_start + 2)
27                 for c in range(col_start, col_start + 2)]
28        winners.append(max(cells, key=lambda cell: feature[cell[0]][cell[1]]))
29pool_grad = [0.5, -0.2, 0.1, 0.3]
30grad_in = [[0.0 for _ in row] for row in feature]
31for (row, col), grad in zip(winners, pool_grad):
32    grad_in[row][col] += grad
33print("saved winners", winners)
34print("max-pool grad_in:")
35for row in grad_in:
36 print(row)1dW [[-3.0, -1.5], [1.0, 0.5]]
2db [-1.5, 0.5]
3dx [-0.7, 0.5]
4ReLU dz [0.0, 4.0]
5saved winners [(1, 1), (1, 2), (2, 1), (2, 2)]
6max-pool grad_in:
7[0.0, 0.0, 0.0, 0.0]
8[0.0, 0.5, -0.2, 0.0]
9[0.0, 0.1, 0.3, 0.0]
10[0.0, 0.0, 0.0, 0.0]In the CNN pipeline from the previous lesson, these local rules connect in reverse order. The dense head sends its input gradient to max-pooling, max-pooling routes that signal to its saved winners, and ReLU passes it only through positions that were positive during the forward pass.
The five-phase PyTorch training loop state machine
Production training orchestrates five distinct operations per batch: zero gradients, forward pass, loss calculation, backward pass, and optimizer step. Misordering these steps stalls training, accumulates phantom gradients, or causes silent convergence bugs.
Here is the exact state transition contract for each phase:
optimizer.zero_grad(set_to_none=True): PyTorch accumulates gradients by default. Before launching a new backward pass, we must reset parameter.gradattributes. Passingset_to_none=Trueleaves those attributes asNoneinstead of filling existing tensors with zeros. PyTorch documents a generally lower memory footprint and a modest performance benefit, with the important behavior that optimizers skip parameters whose gradients remainNone.[9]- Forward pass (
predictions = model(inputs)): Autograd operates as a dynamic "define-by-run" tape. As tensors flow through layers, PyTorch records mathematical operations, builds a directed acyclic graph (DAG), and automatically saves the tensors each backward formula needs. Custom autograd functions request those saved tensors explicitly withctx.save_for_backward; built-in operations manage them internally.[2] - Loss evaluation (
loss = criterion(predictions, targets)): The criterion reduces this batch's prediction errors into one scalar. That scalar tensor forms the root of the autograd DAG, with itsgrad_fnattribute pointing to the final operation (for example,<MseBackward0>). - Backward pass (
loss.backward()): Calling.backward()on the root scalar traverses the DAG in reverse topological order. PyTorch executes local vector-Jacobian products, multiplies incoming gradients along all paths, and accumulates partial derivatives directly into leaf parameter.gradbuffers. Once backward finishes, the intermediate activation graph is freed by default (retain_graph=False). - Optimizer step (
optimizer.step()): The optimizer updates registered parameters in place. For the SGD optimizer used here, the rule is ; adaptive optimizers transform the stored gradient before updating. The optimizer doesn't clear gradients, so that responsibility remains withzero_grad().
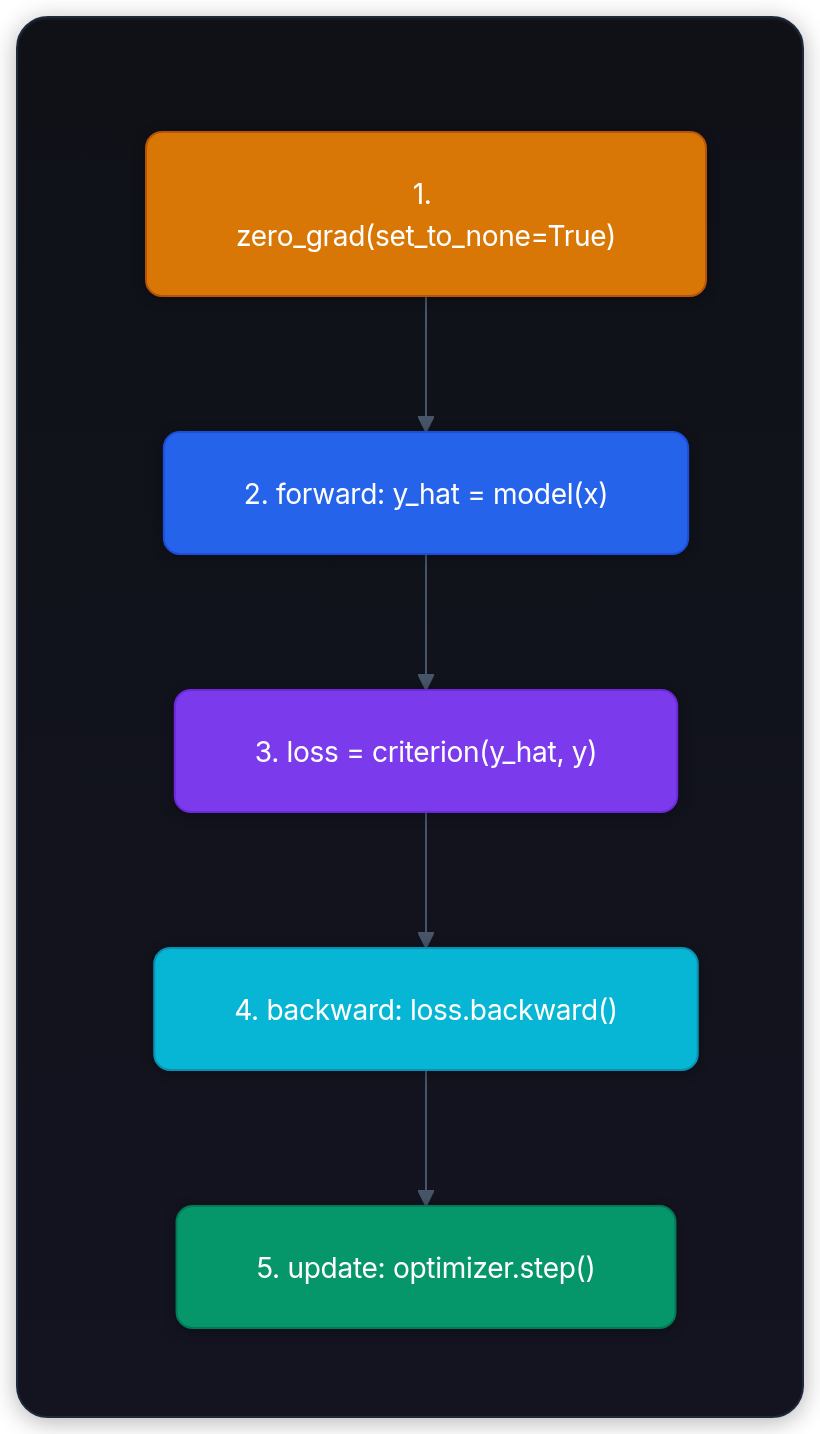
Let's test this complete loop on our latency dataset:
1import torch
2from torch import nn
3
4features = torch.tensor([[1.0], [2.0], [3.0]])
5targets = torch.tensor([[3.0], [5.0], [7.0]])
6model = nn.Linear(1, 1)
7
8with torch.no_grad():
9    model.weight.fill_(0.0)
10    model.bias.fill_(0.0)
11
12optimizer = torch.optim.SGD(model.parameters(), lr=0.08)
13loss_fn = nn.MSELoss(reduction="mean")
14
15optimizer.zero_grad(set_to_none=True)
16predictions = model(features)
17loss = 0.5 * loss_fn(predictions, targets)
18loss.backward()
19
20print(f"loss before update: {loss.item():.4f}")
21print(f"dL/dw={model.weight.grad.item():.3f} dL/db={model.bias.grad.item():.3f}")
22
23optimizer.step()
24
25with torch.no_grad():
26    after_loss = 0.5 * loss_fn(model(features), targets)
27print(f"loss after update:  {after_loss.item():.4f}")
28print(f"updated parameters: w={model.weight.item():.3f} b={model.bias.item():.3f}")1loss before update: 13.8333
2dL/dw=-11.333 dL/db=-5.000
3loss after update: 4.2812
4updated parameters: w=0.907 b=0.400What happens if you omit zero_grad()? Each backward pass adds new gradients to existing ones. Running two consecutive backward calls doubles the gradient magnitude and takes an unintentional double-sized step:
1import torch
2
3w = torch.tensor(1.0, requires_grad=True)
4loss1 = 0.5 * (w * 2.0 - 6.0) ** 2
5loss1.backward()
6grad_step1 = w.grad.item()
7
8loss2 = 0.5 * (w * 2.0 - 6.0) ** 2
9loss2.backward()
10accumulated_grad = w.grad.item()
11
12w.grad.zero_()
13loss3 = 0.5 * (w * 2.0 - 6.0) ** 2
14loss3.backward()
15cleared_grad = w.grad.item()
16
17print(f"first backward:       {grad_step1:.1f}")
18print(f"without zeroing:      {accumulated_grad:.1f} (doubled!)")
19print(f"after zeroing again: {cleared_grad:.1f}")1first backward: -8.0
2without zeroing: -16.0 (doubled!)
3after zeroing again: -8.0Evaluation mode and no_grad
During validation and inference, we don't compute parameter updates. We use two complementary controls:
model.eval(): Switches module behavior for layers like Dropout (which deactivates mask generation) and BatchNorm (which freezes running population statistics). It doesn't disable autograd tracking.with torch.no_grad():: Disables reverse-mode gradient recording within the current thread and block. Results haverequires_grad=False, so PyTorch doesn't retain the saved tensors needed only for a later backward pass. That reduces memory use for computations that would otherwise track gradients.[2]
Batching dynamics: full batch, mini-batch, and online stochastic
How many examples should contribute to a single parameter update? Optimization operates across three distinct regimes:
| Regime | Examples per update | Updates per data pass | Sampling noise | Hardware pattern |
|---|---|---|---|---|
| Full-batch GD | Entire dataset | None for a fixed dataset | Exact gradient may require accumulation when doesn't fit in memory. | |
| Online SGD | Highest of the three | Tiny operations often underuse parallel hardware. | ||
| Mini-batch SGD | Falls as grows | Batched tensor operations use accelerators efficiently. |
Full-batch gradient descent
Full-batch gradient descent evaluates every example in the dataset before taking a step:
For fixed parameters and a fixed dataset, this is the exact empirical-risk gradient. A large dataset usually can't be materialized as one device batch, although the same exact gradient can be accumulated across smaller chunks before one update. The main cost is update frequency: the optimizer waits for all examples before taking one step.[4]
Online stochastic gradient descent (pure SGD)
Pure SGD uses exactly one sample per update (). Each update is cheap, but its gradient is a noisy estimate of the full gradient. Processing samples one by one also tends to underuse parallel matrix hardware, so many cheap updates can still take longer in wall-clock time.
Mini-batch gradient descent
Mini-batch training trades between update frequency, gradient noise, and hardware utilization. Partitioning data into batches of size converts sample-by-sample work into batched tensor operations, but the best depends on the model, hardware, optimizer, and validation behavior.
Why does reduction="mean" matter? If examples are sampled uniformly, dividing by batch size makes the mini-batch gradient an unbiased estimate of the full-dataset gradient:
Averaging prevents the gradient from doubling merely because the batch contains twice as many examples. Changing still changes sampling noise and the number of optimizer updates per epoch, so the learning rate usually needs fresh validation. Linear and square-root scaling recipes work only under additional optimizer and workload assumptions; neither is a universal batch-size rule.
Let's compare the three batching regimes on a 6-sample dataset:
1data = [(1.0, 3.0), (2.0, 5.0), (3.0, 7.0), (4.0, 9.0), (5.0, 11.0), (6.0, 13.0)]
2
3def run_experiment(batch_size, examples_seen, lr):
4    w, b = 0.0, 0.0
5    steps = examples_seen // batch_size
6    for step in range(steps):
7        idx = (step * batch_size) % len(data)
8        batch = data[idx:idx + batch_size] if batch_size < len(data) else data
9        errs = [w * x + b - y for x, y in batch]
10        gw = sum(e * x for e, (x, _) in zip(errs, batch)) / len(batch)
11        gb = sum(errs) / len(batch)
12        w -= lr * gw
13        b -= lr * gb
14    all_errs = [w * x + b - y for x, y in data]
15    total_loss = sum(0.5 * e**2 for e in all_errs) / len(data)
16    return steps, w, b, total_loss
17
18examples_seen = 60
19full = run_experiment(batch_size=6, examples_seen=examples_seen, lr=0.05)
20mini = run_experiment(batch_size=2, examples_seen=examples_seen, lr=0.05)
21online = run_experiment(batch_size=1, examples_seen=examples_seen, lr=0.05)
22
23for label, batch_size, result in (
24    ("full batch", 6, full),
25    ("mini-batch", 2, mini),
26    ("online SGD", 1, online),
27):
28    updates, w, b, loss = result
29 print(f"{label:10s} B={batch_size}: updates={updates:2d} w={w:.3f} b={b:.3f} loss={loss:.4f}")1full batch B=6: updates=10 w=2.108 b=0.539 loss=0.0204
2mini-batch B=2: updates=30 w=2.041 b=0.706 loss=0.0139
3online SGD B=1: updates=60 w=2.019 b=0.874 loss=0.0022Each run processes 60 example presentations, but the update counts differ: 10 full-batch updates, 30 mini-batch updates, and 60 online updates. The smaller batches happen to reach lower training loss faster on this ordered, noiseless line. That isn't a universal quality ranking. Real training chooses a batch size by measuring validation behavior and accelerator throughput, not by assuming the noisiest gradient wins.
Vanishing and exploding gradients in deep networks
In a multi-layer feedforward network with layers:
Write for the gradient arriving at layer . One reverse step is:
Here is element-wise multiplication, and is the activation derivative evaluated at the saved preactivation. Repeating this rule from layer down to layer multiplies many layer Jacobians, exposing the core instability of deep backpropagation:
- Vanishing gradients: If the repeated layer Jacobians contract the directions carrying the error signal (for example, because of saturating activations or undersized weights), the gradient product can decay exponentially: The earliest layers receive near-zero gradients. Their weights freeze, and depth provides no representational benefit over a shallow model.
- Exploding gradients: If the repeated Jacobians expand those directions, the product can grow exponentially:
Gradients explode into thousands or millions. Parameter updates fling weights far across the loss surface, causing arithmetic overflow (
NaNorInf).
Gradient norm clipping
Pascanu, Mikolov, and Bengio proposed gradient norm clipping to stabilize training when gradients explode.[10] Unlike value clipping (clip_grad_value_), which truncates individual gradient coordinates independently and changes the update direction, norm clipping rescales the entire gradient vector when its Euclidean norm exceeds a threshold :
If , the gradient stays untouched. If , the vector length is clamped to while preserving its search direction. In PyTorch, call clip_grad_norm_ after backward() and before optimizer.step():
1import torch
2from torch import nn
3
4torch.manual_seed(42)
5
6layers = [nn.Linear(4, 4, bias=False) for _ in range(5)]
7model = nn.Sequential(*layers)
8
9with torch.no_grad():
10    for layer in layers:
11        layer.weight.fill_(2.0)
12
13x = torch.ones(1, 4)
14loss = model(x).sum()
15loss.backward()
16
17raw_norm = torch.sqrt(sum(p.grad.norm() ** 2 for p in model.parameters())).item()
18returned_norm = nn.utils.clip_grad_norm_(model.parameters(), max_norm=5.0).item()
19post_clip_norm = torch.sqrt(sum(p.grad.norm() ** 2 for p in model.parameters())).item()
20
21print(f"unclipped gradient norm:        {raw_norm:.2f}")
22print(f"returned norm before clipping:  {returned_norm:.2f}")
23print(f"actual norm after clipping: {post_clip_norm:.2f}")1unclipped gradient norm: 36635.74
2returned norm before clipping: 36635.74
3actual norm after clipping: 5.00Even though deep linear multiplication produced an unclipped gradient norm of , norm clipping reduced the total gradient magnitude to while preserving its direction. The learning rate still controls how far the parameters move after that bound is applied.
Weight initialization: preserving variance across depth
Why can't we initialize weights to zeros or standard normal random numbers?
- Identical initialization: If every neuron in a layer starts with the same weights and bias, each computes the same activation and receives the same gradient. The neurons remain identical across training steps, preventing them from learning distinct features. Setting every weight and bias to zero is the clearest example of this symmetry failure.
- Unscaled initialization: Consider a linear transformation . If inputs and weights are independent with zero mean: If and , the activation variance expands by per layer! Within three layers, activations blow up to extreme magnitudes.
To keep , we must scale weight variance inversely with the number of input connections (fan-in):
Xavier / Glorot initialization
For symmetric activations that are approximately linear near zero (such as and ), Glorot and Bengio balanced the forward pass variance () with the backward pass gradient variance () by using their harmonic mean:[4]
For a normal distribution, use standard deviation . For a uniform distribution, sample from .
He / Kaiming initialization
For a symmetric, zero-mean preactivation , ReLU zeroes the negative half of the distribution. Its second moment becomes:
The equation concerns expected squared activation, not variance: ReLU outputs have a positive mean, so those quantities differ. Under the initialization assumptions, compensating for the halved second moment gives He/Kaiming's fan-in rule:[4]
Let's test activation standard deviations across a 10-layer network in PyTorch:
1import torch
2from torch import nn
3
4torch.manual_seed(42)
5
6dim = 256
7num_layers = 10
8x = torch.randn(1000, dim)
9
10def track_variance(init_fn, activation_fn):
11    h = x
12    stds = [h.std().item()]
13    for _ in range(num_layers):
14        linear = nn.Linear(dim, dim, bias=False)
15        init_fn(linear.weight)
16        h = activation_fn(linear(h))
17        stds.append(h.std().item())
18    return stds
19
20unscaled = track_variance(lambda w: nn.init.normal_(w, std=1.0), nn.ReLU())
21too_small = track_variance(lambda w: nn.init.normal_(w, std=0.01), nn.ReLU())
22xavier = track_variance(lambda w: nn.init.xavier_normal_(w), nn.Tanh())
23kaiming = track_variance(lambda w: nn.init.kaiming_normal_(w, nonlinearity="relu"), nn.ReLU())
24
25print(f"input std:                 {unscaled[0]:.2f}")
26print(f"unscaled after 10 layers:  {unscaled[-1]:.2e}")
27print(f"too small after 10 layers: {too_small[-1]:.2e}")
28print(f"xavier tanh layer 10:      {xavier[-1]:.2f}")
29print(f"kaiming relu layer 10: {kaiming[-1]:.2f}")1input std: 1.00
2unscaled after 10 layers: 2.53e+10
3too small after 10 layers: 3.41e-10
4xavier tanh layer 10: 0.23
5kaiming relu layer 10: 0.78With unscaled weights, activation standard deviation exploded to within 10 layers. With undersized weights, it collapsed to . Kaiming initialization finished at , which remains on the input's order of magnitude rather than guaranteeing an exact value of 1.0 in a finite random network.
Train, validation, and test splits with early stopping
A model that memorizes training data but fails on fresh queries is useless in production. Rigorous evaluation partitions data into three disjoint sets:
- Training set (typically 70-80%): Used by the optimizer to compute gradients and update weights.
- Validation set (typically 10-15%): Held out from backpropagation. Evaluated at regular checkpoint intervals to measure generalization, tune hyperparameters (learning rate, weight decay), and trigger early stopping.
- Test set (typically 10-15%): Locked in a vault until model development concludes. Evaluated exactly once to report unbiased generalization performance before shipping.
Underfitting vs overfitting
Comparing loss curves between training and validation reveals model capacity dynamics:
- Underfitting (high bias): Both training loss and validation loss remain high and plateau early. The model lacks the representational capacity or training time to capture the underlying pattern. Remedy: increase network width/depth, add relevant features, or reduce regularization.
- Overfitting (high variance): Training loss continues descending toward zero while validation loss plateaus and starts climbing upward. The model is memorizing noise specific to the training set. Remedy: early stopping, dropout, weight decay, or acquiring more diverse training data.
Early stopping with checkpointing
Early stopping monitors validation loss after every epoch. If validation loss fails to improve by a threshold min_delta for patience consecutive epochs, training terminates and restores the weights from the lowest-loss checkpoint:
1import copy
2
3class EarlyStopping:
4    def __init__(self, patience: int = 3, min_delta: float = 1e-4):
5        self.patience = patience
6        self.min_delta = min_delta
7        self.best_loss = float("inf")
8        self.best_weights = None
9        self.counter = 0
10        self.should_stop = False
11
12    def update(self, val_loss: float, weights: dict) -> bool:
13        if val_loss < self.best_loss - self.min_delta:
14            self.best_loss = val_loss
15            self.best_weights = copy.deepcopy(weights)
16            self.counter = 0
17        else:
18            self.counter += 1
19            if self.counter >= self.patience:
20                self.should_stop = True
21        return self.should_stop
22
23simulated_val_losses = [4.5, 3.1, 2.0, 1.8, 1.85, 1.92, 2.10, 2.30]
24early_stop = EarlyStopping(patience=3)
25
26for epoch, val_loss in enumerate(simulated_val_losses, start=1):
27    model_state = {"weights": f"checkpoint_epoch_{epoch}"}
28    stopped = early_stop.update(val_loss, model_state)
29    print(f"epoch {epoch}: val_loss={val_loss:.2f} counter={early_stop.counter}/{early_stop.patience}")
30    if stopped:
31        model_state = copy.deepcopy(early_stop.best_weights)
32        print(f"early stopping triggered at epoch {epoch}! restoring best loss: {early_stop.best_loss:.2f}")
33        print(f"restored state: {model_state['weights']}")
34 break1epoch 1: val_loss=4.50 counter=0/3
2epoch 2: val_loss=3.10 counter=0/3
3epoch 3: val_loss=2.00 counter=0/3
4epoch 4: val_loss=1.80 counter=0/3
5epoch 5: val_loss=1.85 counter=1/3
6epoch 6: val_loss=1.92 counter=2/3
7epoch 7: val_loss=2.10 counter=3/3
8early stopping triggered at epoch 7! restoring best loss: 1.80
9restored state: checkpoint_epoch_4At epoch 4, validation loss reached its minimum of 1.80. Over epochs 5, 6, and 7, validation loss deteriorated while training loss continued falling. The early stopping monitor halted training after patience = 3 worsening evaluations and rolled back parameters to the checkpoint from epoch 4.
Why the next loss function matters
Half squared error works well for continuous regression targets like latency in milliseconds. But classification problems, like classifying an issue into bug, docs, or security, and language models predicting the next token from a large vocabulary have a different output contract: the model outputs unnormalized real-valued logits.
The underlying backpropagation engine remains unchanged. Only the output head and loss function adapt: softmax normalizes raw logits into a probability distribution, cross-entropy penalizes probability assigned to incorrect classes, and their combined gradient initiates the reverse sweep. Raw logits carry one more risk this lesson doesn't solve: naively exponentiating a large score can overflow floating point to inf, then produce NaN during normalization. The next lesson derives the max-subtraction fix that leaves the mathematical softmax unchanged while keeping every exponential at or below 1.0.
Diagnose a broken update
When training behaves erratically, reduce your run to a single reproducible batch and inspect tensor states:
| Symptom | Root cause | Diagnostic check |
|---|---|---|
| Gradients look correct, but loss increases after step. | Learning rate is too large. | Reduce by . Check residual contraction factor . |
| Gradients grow larger on every mini-batch. | Stale gradients not cleared. | Verify optimizer.zero_grad(set_to_none=True) runs before loss.backward(). |
Loss suddenly becomes NaN or Inf. | Exploding gradients in deep layers. | Check gradient norm before optimizer step. Add torch.nn.utils.clip_grad_norm_. |
| Early layer weights receive near-zero updates. | Vanishing gradients or dead ReLUs. | Check preactivations for negative bias. Switch to He initialization or LeakyReLU/GELU. |
| Activations explode to in early layers. | Improper weight initialization scale. | Check fan-in variance. Apply Xavier for tanh or He for ReLU activations. |
| Training loss falls steadily but validation loss rises. | Model overfitting training set. | Add early stopping, verify validation set construction, and apply weight decay. |
| Validation uses excessive GPU VRAM. | Missing torch.no_grad() context. | Wrap validation loop in with torch.no_grad(): to disable activation caching. |
Checkpoints & practice
Keep the original residual -4.0 but change the input to x = -2.0 by starting at w = -1.0, b = 0.0. With learning rate 0.1, which parameter moves down, and does the prediction still rise?
Answer
dL/dw = (-4.0) * (-2.0) = 8.0, while dL/db = -4.0. The updated parameters are w = -1.0 - 0.1(8.0) = -1.8 and b = 0.0 - 0.1(-4.0) = 0.4. The prediction becomes (-1.8)(-2.0) + 0.4 = 4.0. The weight decreases, but because x is negative, a lower weight produces a higher prediction. The input sign dictates the parameter update direction.
At x = 2.0, what happens to the residual if the learning rate is exactly 0.2? What happens if it's 0.4?
Answer
The residual update factor is 1 - 5*eta. When eta = 0.2, 1 - 5(0.2) = 0.0, zeroing the residual in a single step. When eta = 0.4, 1 - 5(0.4) = -1.0: the residual flips sign (-4 becomes +4) but keeps its exact magnitude, so the loss never improves.
Why does PyTorch default to accumulating gradients across backward() calls instead of overwriting them?
Answer
Gradient accumulation lets you simulate large mini-batch sizes that exceed GPU memory capacity. You can execute multiple forward and backward passes across sequential micro-batches, accumulating gradients into param.grad, and only call optimizer.step() once. That's why you must explicitly call zero_grad() when starting a fresh batch.
Why does gradient norm clipping preserve the update direction while coordinate-wise gradient value clipping can change it?
Answer
Value clipping clamps every individual coordinate to [-C, C], altering the angle and direction of the gradient vector. Norm clipping scales the entire vector by C / ||g||, preserving the exact search direction while capping the overall update magnitude.